A veteran bass clarinet player’s take on the whole instrument stand controversy (complete with photos and directions for making your very own) by:
Terry L. “SOTSDO” Stibal, Esq.
One problem that has faced clarinet and saxophone players from the early 19th Century was just what a player did with the horn when it wasn’t being played. And, with multiple clarinets in hand from the very beginning, this has been a long-established problem.
With the advent of musical theatre, the problem compounded. Woodwind instrument musicians in the orchestra pit are presented with parts requiring three or more instruments, limited space to store them in, and a continual series of rapid horn changes performed in a low-light environment, one that is rich in opportunities to accidentally knock the horns around.
Compounding this problem even further was the dilemma facing the player of the larger clarinets and the huge baritone saxophone: musical instruments worth many thousands of dollars, awkward in size and weight, and used in situations with never enough space to put them down in a safe location.
For all of these reasons, there were created instrument stands. The oldest I ever saw was a clarinet peg that dated well back before 1900. As time went on and dance bands enabled thousands of opportunities for saxophone players to embarrass themselves on clarinet and flute, specialized, multiple instrument, folding stands were developed, many of which are still being marketed today.
However, there are some problems with the stands on the market. While your typical alto sax player can extract a “one stand, many horns” instrument stand from its flannel carrying bag, and then smugly open his/her Traypak case, throw his/her three horns together, and sits ready well before the downbeat, the poor baritone player has no such luck. Instead, s/he is presented with a bunch of light-gauge tubular stands that may fold up nicely enough, but which also do not have any provisions for the other horns that s/he has to play. In addition, it is difficult to lift a baritone from many of them while seated in a chair.
It gets worse, for in most Broadway musicals, the baritone sax player also lands the fortunate job of playing bass clarinet. While an excellent complement to the female voice, it is another awkward instrument to handle, and one for which all too few instrument stands are provided, most of which are unstable in the bargain.
I grew up with the philosophy of 1) never play anything you can’t carry (skinny little harp players, take note); 2) take good care of your equipment; and 3) if presented with a problem, try to solve it to the best of your ability. But, when first confronting this instrument stand conundrum with the bass clarinet, I was tempted to throw in the towel.
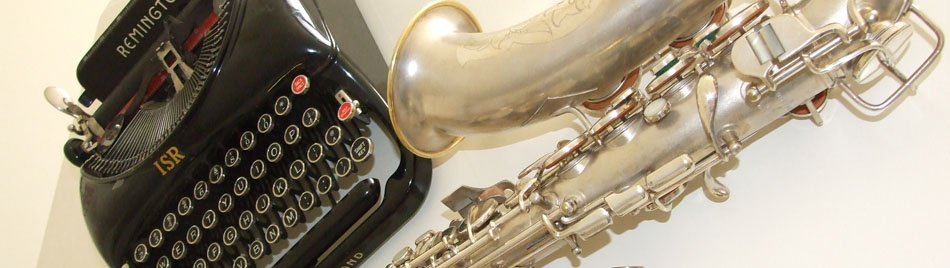
In the early 1960s, I was partially saved by the discovery of a brand of instrument stand that went a long way towards solving the problem. Called the Anderson brand stand, it is a clever arrangement of spring steel and die cast aluminum metal that allows the bass clarinet player to keep a horn ready to hand without having to haul along a three foot long strut of metal in the bargain. Even better, the base of the Anderson stand has two tapped holes that will hold standard instrument pegs for clarinets, flutes or oboes.
It is this saxophone adaptation that is shown here; the all-important bass clarinet version will show up later in this article.
Oddly enough, the inventor of the Anderson stand also made it very adaptable, with the basic components arranged so that a few substitutions allow the same stand to be used for alto or tenor saxophone. Flexibility personified, from back in an era when things were anything but flexible.
But, as good as the Anderson stand is (and I’ve used them in one form or another for over forty-five years), it doesn’t take care of all of the problems. It’s not the most stable stand in the world as designed. And, what about the baritone saxophone, a heavy beast that’s hard to store in the case, much less in an orchestra pit? Then, there’s the bass clarinet and bassoon, not as heavy but both still cumbersome horns to store. And finally, they aren’t being made any longer, so you have to find them second-hand. (Here, as always, eBay is your friend.)
While you can get stands for each of the instruments mentioned above, there’s no one rock-solid “universal field theory” commercial solution available. A foot placed on a convenient stand leg of an Anderson stand can often stabilize it very well, but multiple stands with only one free foot leave little room for error. SAXRAX stands are great — as long as you are playing the horns for which they build their stands; no bass clarinet options in their inventory at all. (They also are expensive as hell, and did not exist forty years ago when the first version of this stand system was made.) And, particularly for the ultra-top heavy bass clarinet, those stands that are available for purchase are usually “tippy” and unstable if exposed to any form of accidental contact.
I have even seen one instance of two different stands (a clarinet/alto sax stand, and a tenor sax stand) both tipped over at the same time, one after another. Mind you, neither one fell (instead, they were caught at the last instant), but the potential was there for one big catastrophe.
One Family’s Solution
So, I (or perhaps I should say we, for my father played an integral part in the process) assembled one. My objectives were to, a) avoid the dreaded tip-over problem; b) not hold the baritone by the bell (as with a Hamilton, bell-scratching, key word stressing, wrap around clamp type of stand, a horror to anyone who cares about their precious horn); c) keep it compact (for easy trips into and out of the pits and bandstands); d) keep it portable; and e) make it as versatile as possible.
In the end, I succeeded with a design that my father suggested to me back in the 1960s when I first became aware of the problem, a design I now call the “modified H-bar stand”. The original one that he lovingly created for me in a single weekend is long since gone, stolen by the evil brother of my future step-daughter-in-law’s husband (a bassoon/baritone player, who coveted it after we finished a production of Company after work at Loretto-Hilton theater in Saint Louis back in the 1970s — mind you, the experience of playing as one of two baris pumping away during the dance numbers in the second act almost made it worthwhile.) However, I recreated it on my own ten years later when I again started playing after a long hiatus, and then rebuilt it again to “quality standards” in the early 1990s.
Originally, I put together an extensive article on this instrument stand of instrument stands for the inhabitants of The Woodwind Forum, complete with posed photos atop our hot tub in our sunny back yard in Pearland TX. (The photos were taken outdoors to avoid the flash reflection problem inherent with plated musical instruments — the “non-point” light source that is the sun avoids this “flash back” problem completely.) However, for some reason or other, the original got misplaced (I suspect the ill-advised actions of a malicious tenor player, but no matter). A pity, really, as it had a full scaled layout illustration of the completed stand as well.
In our current situation, I don’t have access to all of the components which I will be mentioning, nor all of the horns any longer, nor a decent graphics program in which to re-image the illustration. So, I cannot completely recreate the original version of this article. (I do have all of the original photographs, however, kept in a folder on my hard drive separate from the iPhoto archive, which I recently cleared out completely.) In any event, my lovely wife Joyce Ann and I have done our best to put things back in order for this follow-on version. Here’s hoping that it helps at least one person to reach this ultimate plateau of horn accessibility and stability.
The ultimate woodwind doubler’s stand: Here’s how to make your own
Scattered throughout the body of this article is a set of references to various “removable” hardware items, such as the baritone stand attachment bolts, wing nuts, and washers of various types and sizes, and rubber toilet seat grommets/feet. When doing your initial purchases, take the time (and money) to buy five or six extra of each. There’s nothing worse than finding out you’ve lost that critical washer or wing nut the afternoon of a band job, and then learning that the local hardware is fresh out of the same size. As Kelly Bundy, of Married…With Children fame once said, “Forewarned is four-armed”.
Fabricating the Stand Base
The stand uses three pieces of oak 2″ x 4″ finish-grade lumber, carefully mortised to fit together in an “H-shape” as seen in the photos. This latest time, I had this done at a planning mill with the oak, but I did the original recreation with standard 2″ x 4″ lumber and hand tools at home.
While standard 2″ x 4″ softwood lumber is a lot cheaper, and somewhat easier to work as well, it doesn’t hold up as well under handling and use as the oak. Also, you will have better luck getting dead straight oak lumber than you will fir or pine.
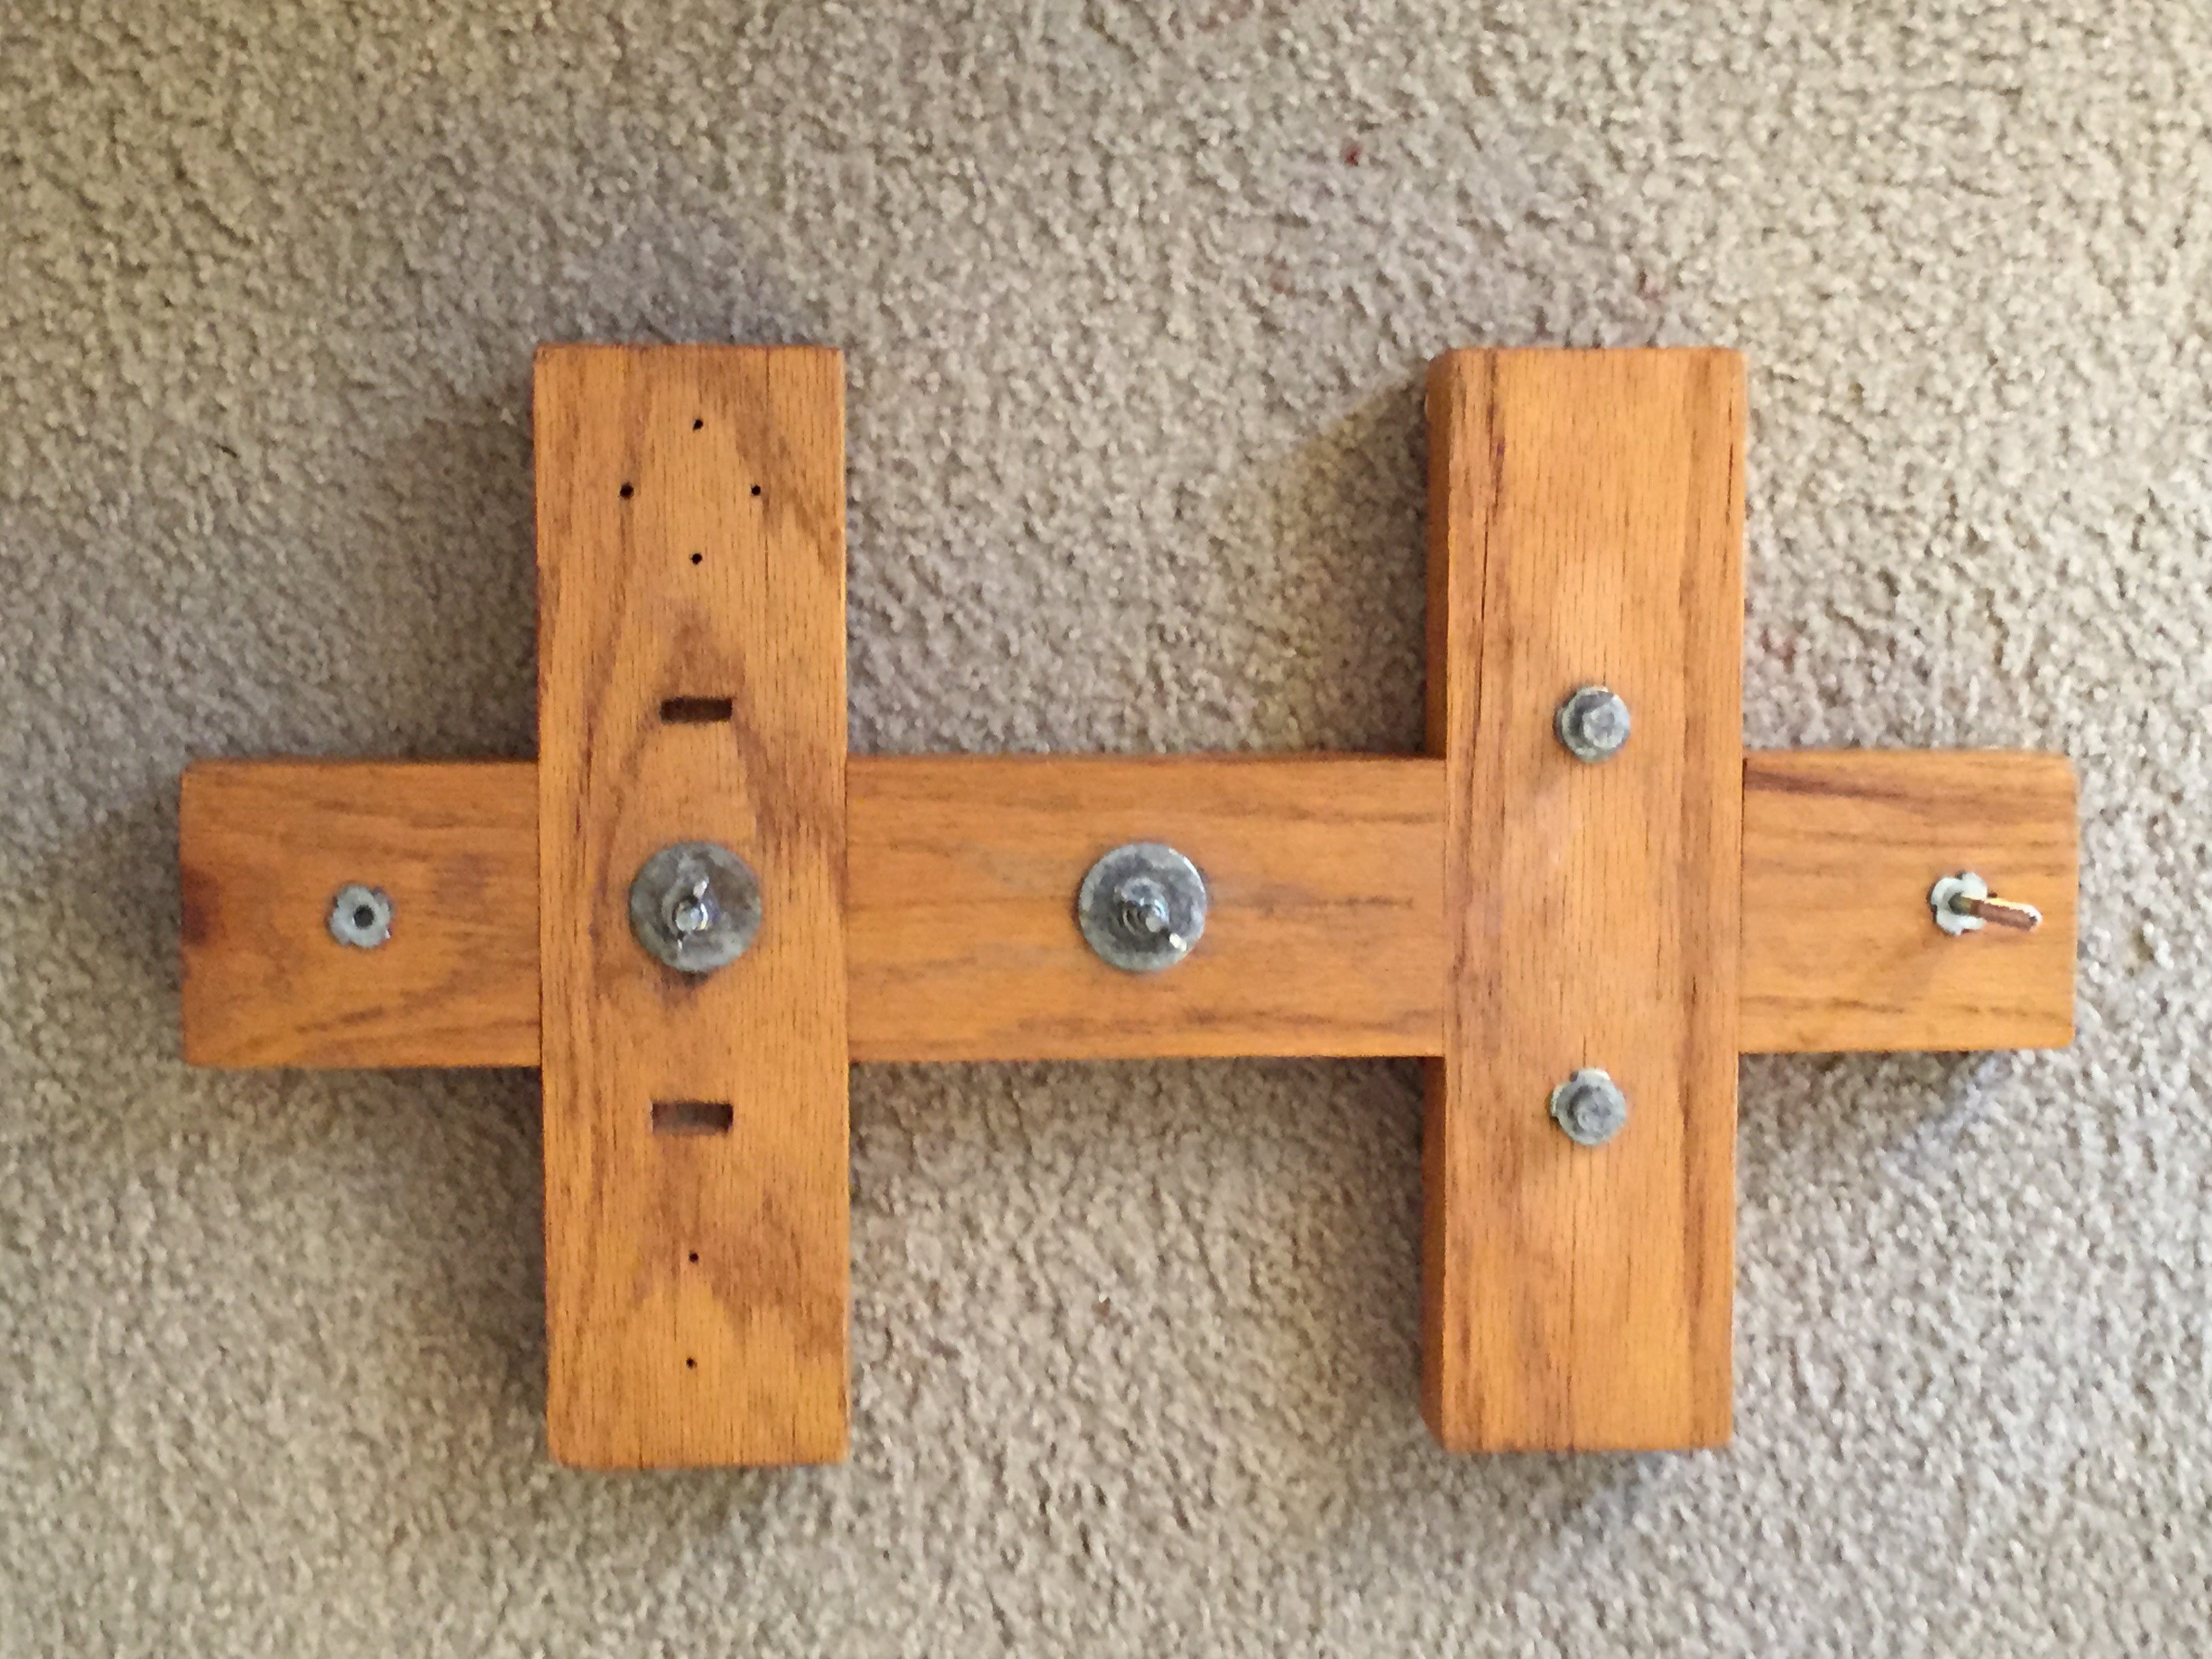
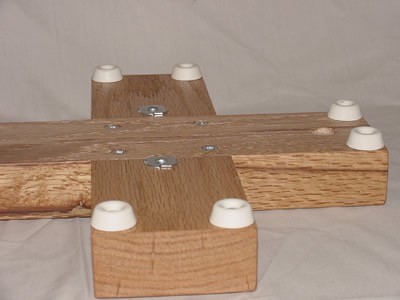
This photo shows the completed stand base in its latest version. The three pieces of oak lumber measure 22″ long (for the long “cross bar” of the “H”), and 11″ for the two vertical pieces. The two short lengths are notched (mortised) at their centers so as to fit into similar cutouts located at 4″ from the two ends of the longer piece.
Carefully plot the layout lines so that the fit will start out as a tight one. You “notch” out half of the thickness of each piece at the appropriate spot, either by sawing and chiseling (good), or by having it done on a stable cross-cut saw table, and then finishing the edges with your chisel (better), carefully shaving the cheeks of the mortises until the whole thing fits together with little wiggle room on any side.
Either way, the end result is the letter “H” with the extension on either side of the vertical components, as seen in the plan-view photograph above.
Remember, the 22″ long leg of the “H” is the “cross piece” of the letter, with the ends protruding outside of the two shorter pieces. Once assembled and provided with rubber feet (for the procurement of which, pay very close attention to the comments below), it’s almost as stable as the Great Pyramid, taking a fifteen-pound-plus pull on the end of the horns to even tip the thing.
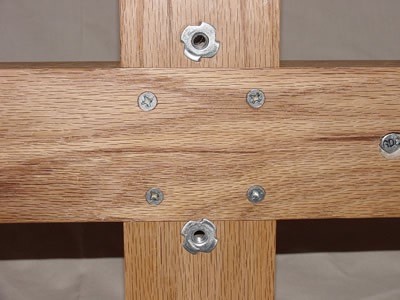
Inserted through the wood in this photo are four of the eight screws used to initially hold the pieces together. After trimming and easing the joints between the two pieces of the base on each side, drill pilot holes for each of the four screws placed into each joint, glue the cross members in place, and then drive the screws through the pilot holes to hold it all together.
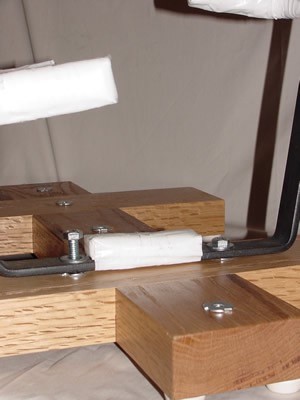
Once the glue is thoroughly set, carefully drill the through-holes for the various stand bolts. (In this photo of the bottom of the base, you can see the two for mounting the baritone stand with the “T-nuts” already pressed into place, along with a counter-sink on the right side for the head of a bolt used to mount a socket in the upper surface of the base.) You can drill these holes with a hand-held drill, but a drill press gives the best results. And, Forstner drill bits return a cleaner hole if you can use them.
Make note of the distance between the centers of the two “T-nut” installations; you will need to give this information to the metal fabricator who makes your baritone stand (see below).
Once the base is assembled and glued up, lightly round all of the edges of the wooden cross-members with a sanding block or sander, this to prevent damage to the sharp edges of the base when you stomp on it in the dark. Then, paint or otherwise finish the stand base and set it aside to dry.
Fitting the Attachment Hardware
Now that the stand base is fabricated, it is time to fix the hardware onto same. Through two of the holes, a bolt is threaded through “T-nuts” mounted on both top and bottom surfaces. Once this bolt has been tightened down, it presses the “T-nuts” into the wood surface of the stand base from both sides. When the stand is completed, these same bolts will be tightened down through washers and the two holes in the base of the baritone stand into these same “T-nuts” to pin the baritone stand into place and make it a stable stand and base.
Other bolts are led through countersunk holes in the stand base at the positions indicated, this time with a washer under the bolt head, and a single “T-nut” on top of the stand base to lock them in place. These bolt ends serve as the mounting points for the Anderson-brand die-cast aluminum bass clarinet and saxophone stands purchased back in the 1970s, and for my bassoon stand.
Anderson, the northern Indiana/southern Michigan manufacturer of the sax and bass clarinet stands, is long since out of business, but for years I have picked them up second hand just to keep the spare parts in stock – I’ve bought a number off of eBay in the past few years.
Installed under the base of each Anderson stand on top of the base is a large “fender washer”. This serves as a broad base upon which the stand can be secured tightly, without pressing the flanges of the stand into the wood of the base. These “fender washers” are often hard to find (being a relic of the 1950s, when they were used to help secure fenders to cars of the era). Look for them in the “specialty fasteners” section of the Hardware Aisle at Lowe’s or The Home Depot.
Where “Toilet” Comes Into Play Here
On the bottom of the “H” assembly are a large number of white “toilet seat” grommets/cushions, purchased from either The Home Depot or Lowe’s. Look for these items specifically, rather than any substitute, as I have found these to be the most “grippy” of those available, while still remaining strong enough not to rip apart under strain. Make sure to follow the precise pattern of distribution as well, with six under each end of the stand base as shown in the photo below; this ensures that, no matter from what direction that flute player snags her long, raven locks on your bass or baritone, there will be resistance both to overturning and to dragging.
When attaching these bumpers to the base, do not use the screws that ship with them. Instead, use the longer, pan-head screws (installed into carefully sized pilot holes in the bottom of the stand base) to secure them in place. Do not use standard wood screws for this purpose, as the wedge shape of the bottom of their heads will pull out right of the rubber bumpers when under extreme stress.
Horn Stand Attachment Points
Being the prestige instrument in my eyes, the bass clarinet normally occupies the center location (in the center of the “H” crossbar), while any alto/tenor stand was usually offset slightly to one side. (The Anderson sax stand is adaptable to either horn with the simple change of a couple of parts.) In the photo of the full stand at the end of this article, things are switched around a bit for that particular job, and the bass clarinet version is there in the place of honor.
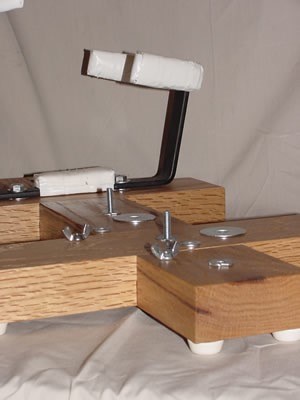
Also seen here are the wing nuts, regular washers and fender washers used with the protruding bolt ends to attach the Anderson stands. The large diameter fender washer goes underneath the Anderson stand to protect the wooden stand base, and the wing nut is tightened down over the washer atop the Anderson stand’s strut, pinning it in place and locking in the stand’s orientation in the bargain.
Peg Sockets
Atop the short stub sections of the wood protruding from the side of the “H” are mounted “T-nuts” secured through the wood by the short bolts driven up from the bottom through the counter sinks and their washers, leaving a short, threaded socket on the top surface. (Make sure that you provide a countersunk recess for the bolt heads in the bottom of the wooden stand base, installing a washer of the right diameter in the bottom of the counter-sink before threading the bolt through same and into the bottom of the “T-nut”. (The opening for one of these can just be seen in the foreground of the photo above.) Also, put a light coat of the Loc-Tite compound in the non-flange end of the “T-nut” before bolting it all together. This will keep the bolt and socket “locked together” and prevent them from “backing out” through normal handling and vibration.
These sockets take standard ¼”- 20 “traditional standard” threaded clarinet and flute pegs, along with stands for the occasional oboe or English horn. (Some newer pegs have threaded attachment screws of a different size; if you plan to use one of these, modify your arrangements accordingly.) All together, there are two such mounts shown on the finished stand in the last photo, although I changed third into an additional sax stand location since forming my own group, as I was doubling baritone and alto a lot.
In my case, the baritone stand is a permanent feature on the right, the better to allow room to swing it onto and off of the stand. Two sets of “T-nuts” have been pulled into the wood, and a pair of substantial bolts (with washers under the heads) extend down from the top through both of them to firmly trap the baritone stand in place against the top of the stand base. Although I normally left the big bari stand mounted at all times, I also purchased a short Crescent wrench to install and remove the baritone stand bolts, just in case.
The Last Baritone Stand You’ll Ever Need
Now that the mounting is complete, let’s get the baritone stand put together. A word of warning here: this element is probably the only thing with the stand that falls outside of the typical homeowner’s skill set (basic carpentry and tool use). As a result, we’ll be leaning on an outside provider to get this done right the first time.
The baritone stand is fabricated out of 1″ (nominal) by 5/16″ (nominal) strap steel stock (big enough material to hold the horn securely, but not any heavier than absolutely necessary), cut to length and then bent to shape, and welded up to your specification at a local welding fabrication shop. (Check your phone book/the internet for a location near you, and don’t let all dirt and grit put you off.)
Start by tracing out the outline of your baritone on a large piece of paper (like a couple of sheets from a desktop calendar taped together). Note where the various brackets can be placed without hanging up on your key work. Both the top bell bracket and the intermediate one are critical, so make sure that they are properly situated, and that the arms of the intermediate bracket are not too short.
Then, haul the finished tracing (and your horn) to the fab shop and explain to them what you are looking to create. Show them the photos attached to this article as well. Point out that the spacing between arms of the stand is hyper-critical — too long or angled too tightly and you will have hang ups; too short or angled too loosely and your horn may “roll out” of the stand. Make sure that they understand the exact spacing and sizing for the holes for mounting the stand. Again, an
error here can cause you a world of hurt.
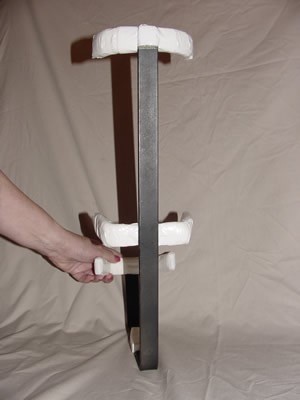
The top bracket needs to be formed so as to cradle the bell. Mine were all done on a roll former that rendered a smooth curve to match the contour of my bell; this is a common tool in welding fabrication shops. However, it can be made with angled bends as well, as long as care is taken to cradle the bell. Make sure you have your horn and these photos of my stand along when you visit, and the shop can figure out the rest.
It cost me all of ten dollars to get the last one of these done, and it is custom fitted to my horn so as to avoid damage to any of the contact points. Yours will almost certainly be different (and perhaps twice as expensive), but they will roll, bend and weld your stand to fit your horn, so don’t worry — you’ll be getting your money’s worth and more.
Once the stand is completed, have them grind down any high spots on the welds, have them carefully drill the two stand mounting bolt holes, and then clean the raw metalwork with a solvent like lighter fluid or paint thinner. Then, give it two or three coats of flat black paint from a spray can, with the stand left to dry thoroughly between coats. Some shops will include this in their services.
The photo on the right shows the effects of about ten years of wear on the hockey tape wrapping the foam padding in place. It takes about an hour to replace the tape and having it look like the photo on the left.
Assembling the Baritone Stand
As mentioned above, the baritone stand is pinned to the base with a pair of substantial bolts, under the heads of which are trapped two washers. Once the bolts are tightened up against the bottom bar of the stand, and into the two sockets beneath each one, the connection needs a wrench to be undone.
As mentioned above, the stand can be disassembled with a wrench. However, keeping it all together is the best approach to take if you have the space to transport it as is.
Hockey Time
The various saxophone stand “supports” are first wrapped with several layers of thin sheets of HDPE (high density polyethylene) foam (like that used to pack computers, or your mother’s fine china when you are moving), and then neatly wrapped with vinyl “hockey tape” — a very useful substance to have around the house for a wide variety of purposes.
The tape can be bought by mail order, or at any ice rink with a hockey program. The foam can be purchased, although the only place I’ve ever seen it for sale is at The Container Store, and then only in the thin sheets. The blocks that are needed for the central “chubby” pad I’ve only found in packing materials, although you can purchase the same material from a plastics supply house if needed.
Note the central, “chubby” pad wrapped around the bottom portion of the central strap for the baritone stand, made from a larger, single block of the same HDPE material. This is the point where the weight of the baritone is borne, with the remaining portions of the stand only serving to “position” the horn in place. Make sure that you make this out of one block of the material, not multiple wraps of the thinner foam, as it is placed under substantial loading each and every time that the baritone squats down on its little pillow, and layers will shear through in time.
The hockey tape, while being remarkable adaptable and flexible for the purpose, is not a permanent solution. (Hockey tape like this is used to bind player’s socks in place, and is torn off after each match.) You will need to re-tape the padding on the various stand components every ten years or so. Also, you can get the tape in colors other than white, should you wish for a lower visibility stand. However, on more than one occasion, I have found the light color to be an asset in a dimly lit orchestra pit.
The “Lumber Rack”
The bassoon stand that I used in this version of the stand is the upper, horn holding section of a Fox brand bassoon stand. The portion used is similar in shape and form to the baritone stand pictured above, with an upper cradle crosspiece, and a lower U-shaped bracket that surrounds the end of the horn’s boot joint.
The stand in question was picked up in a Brook-Mays junk bin, right before they went out of business. It cost me all of $5.00, but is retailing at this time for something near $85.00. Ka-ching! It disassembled into two parts for easy carriage, and (wonder of wonders) the hole for the assembly bolt for the two halves matched my stand bolt-on system perfectly. I simply chiseled a pair of small holes in the top of the stand to engage the small foot protrusions on the original stand, and — presto! — a perfect fit.
It too is held in place by a bolt passed up through the stand base, through another pair of “T-nuts”, one on the bottom of the wood and the other on the top. A wing nut with a washer secures the stand into place over another fender washer, or the same location can be used for a sax stand if desired.
And, if you don’t need it, the same location serves as a mount for another Anderson stand. One of the great advantages with this stand base is that it is so readily adaptable to changing things around. You could even install another Anderson stand mount between the two mounting bolt points for the baritone stand, thus offering three such mounts — just pull or replace the mounting bolt threaded through the “T-nuts” as required.
Roll Your Own
You may not be as lucky as I was this time around to find a virtually free bassoon stand. If not, you could buy one at the inflated Fox price, or you could create a stand for your bassoon through the same process as used for the one for the baritone, just as I did for the original bassoon rack used with my stolen stand back in the 1960s.
Once the stand structure is fabricated, paint and pad it as outlined above for the baritone stand. When complete, fasten it down to the wooden stand base by using the same wing nut and washer combination over a bolt stuck up through two “T-nuts” from below the base as is used for the Anderson stands.
There are no photos of any of this, unfortunately. I retro-fit the bassoon stand to my rack well after most of these photos were taken, and the stand is now in a storage container somewhere.
Odds And Ends
Other areas of these stand bottoms have held cups and boxes (usually of the plastic kitchenware type) in the past. One was an accessories box (for holding spare wing nuts and washers and the like, as well as the short little wrench I picked up somewhere), and another was a “cupholder” for the inevitable water cup for bassoon playing, or a Coke bottle during normal gigs. However, they didn’t hold up very well under heavy usage, and are now missing in action. (You can still see the four screw holes for the cup holder on this stand in the plan view photo above.)
I also found it much more convenient to attach a cup holder to the shaft of my music stand, and then place my reed pot on that platform. When making a quick change to the bassoon from the baritone (as I had to do the time I played Li’l Abner), you had to get a lot done in less than three bars — every inch of movement you could save contributed to the success of that hellish maneuver.
The utimate woodwind doubler’s stand, in all its assembled glory

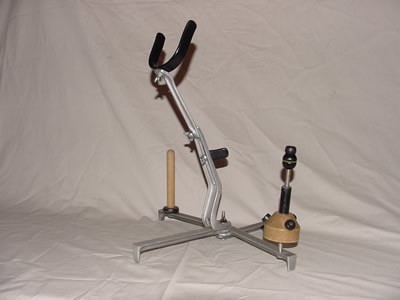
The photo here gives a good sense of the proportions of the stand arms, as well as of the overall configuration of the stand. Even though the spacing is a bit on the tight side, it is well suited to orchestra pit use as well as use on the bandstand, where the space between the fronts is somewhat limited in most situations. The bass is moved off to one side in order to allow quicker changes with the baritone — the alto had limited use in the show in question (Guys and Dolls), so I left it in the hole between the two principal horns
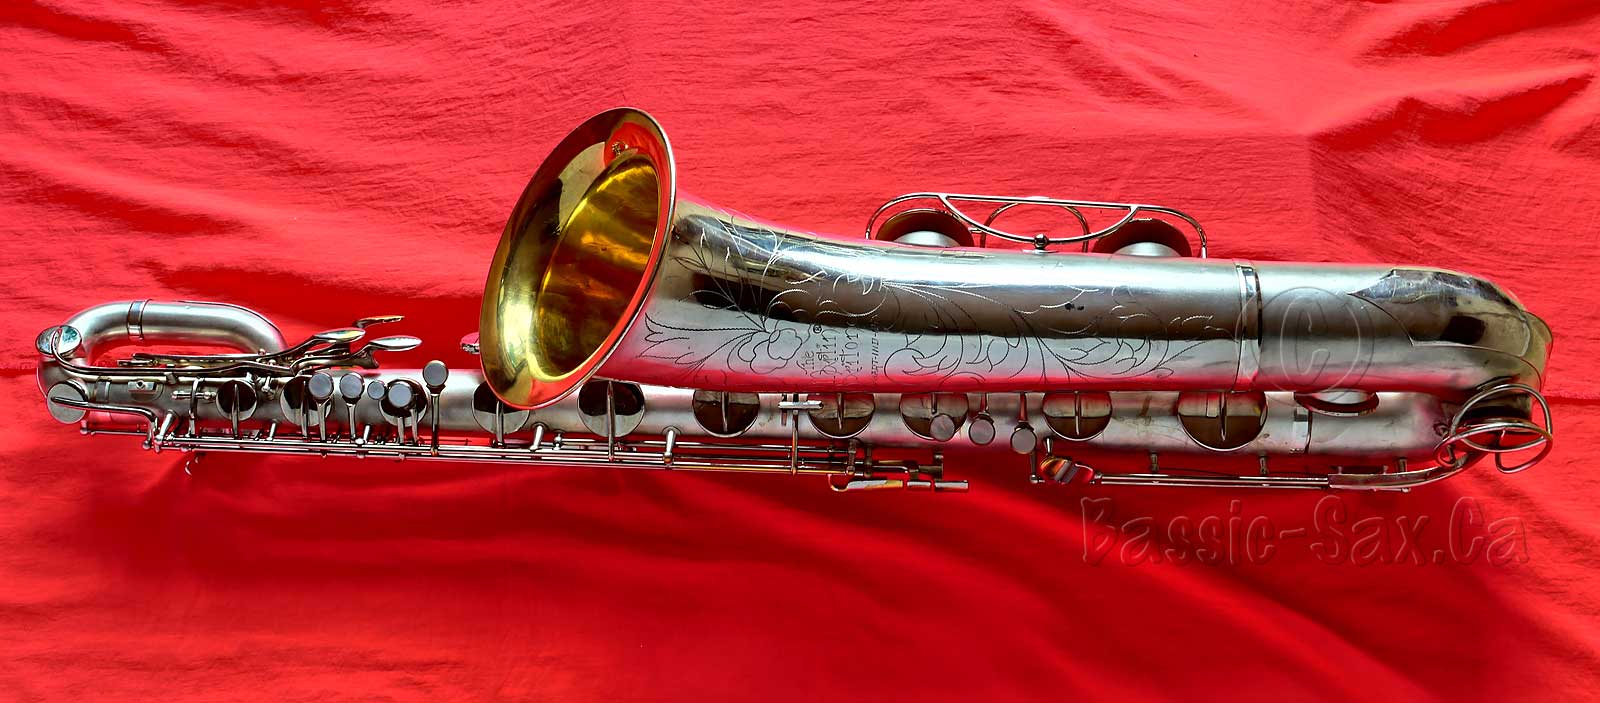
For the record, the horns are my Gemeinhardt flute in C (a cheap one down to C only – I ain’t a good flute player by anyone’s standards you might choose to apply, but I can choke out Do The Hustle well enough if required to do so), my Yamaha YBS 62 baritone in Eb to low A, my “artist model” Conn alto in Eb, complete with extensive custom engraving of some flapper named “Helen Willson” on the bell, my beloved Selmer Model 32 bass clarinet in Bb to low C, and my equally beloved Selmer Series 9 full Boehm soprano clarinet in Bb to low Eb.
Mind you, the whole stand I’ve just described is a mash-up of the first order, put together from lumber, fabricated steel, portions of obsolete aluminum stands that are still every bit as good as they were back in the 1920s, part of a commercial bassoon stand, various manufactured pegs, hockey tape (hockey tape, for God’s sake!!!), and more than a little toilet hardware. But, go to the trouble, and when that one horrific incident in the pit or on the bandstand occurs, you won’t be regretting it for the rest of your life.
– • –
Bill of Materials
8 foot length of 2″ x 4″ lumber (soft- (cheaper and more available) or hardwood (preferred, but much more expensive); used to fabricate pieces of wooden support for stand structure)
14 foot length of 1″ (nominal) x 5/16″ (nominal) steel strapping (used to fabricate the baritone stand; add additional 10 foot length if a fabricated bassoon stand is desired)
2 or 3 ¼”- 20 steel bolts, 2 ½” long (used to provide attachment points for Anderson bass clarinet stand, saxophone stands, and bassoon stand to base of stand) *
2 (or more) 5/16″- 18 steel bolts, 2″ long (used to attach baritone stand to stand base) *
2 ¼”- 20 diameter steel bolts, 1″ long (used as part of clarinet peg sockets, bolted through stand base)
16 ¼” diameter steel or brass screws, 1″ long (used to secure cross-members in place after gluing)
4 ¼”- 20 “T-nuts” (used to secure stand mounting bolts through wooden cross members)
4 5/16″- 18 “T-nuts” (used to secure baritone stand mounting bolts through wooden cross members)
10 (or more) ⅝” steel washers (used under wing nuts on stand attachment bolts and bolt heads) *
2 (or more) 7/16″ steel washers (used under bolt heads of baritone stand attachment bolts) *
3 (or more) 1 ½” steel “fender” washers (used under the base of the Anderson stands to protect wood surfaces of cross-pieces) *
4 (or more) ¼”- 20 wing nuts (used to secure the Anderson stands to their attachment bolts) *
12 (or more) white “toilet seat” grommets/bumpers from either The Home Depot or Lowe’s – do not skimp here and buy something else (and, buy extra in case any of them ever gets torn up) *
12 ⅛” diameter 1″ long steel “pan head” screws (to attach the toilet seat grommets/bumpers to the finished wood base; do not skimp here by using the screws provided with the grommets)
1 (or more) Anderson brand bass clarinet stands/saxophone stands (sourced second-hand from a friend or eBay)
1 Fox bassoon stand (sourced either new or second hand; alternatively, a suitable bassoon stand could be fabricated by the same welding shop)
Loc-Tite bolt thread compound (used to keep bolts from working free from sockets)
A considerable amount of HDPE packing foam sheeting, sourced from packages or from The Container Store (used to pad cross members on the baritone stand and a fabricated bassoon stand (if built)) *
1″ cross-section block of HDPE unitary packing foam (for padding for base of baritone stand) *
2 rolls of white hockey tape (to cover stand brackets for fabricated baritone and bassoon stands)
High strength wood glue (used to glue members of stand base together)
Sufficient paint or wood finish (to finish stand base)
Sufficient flat black spray paint (to finish baritone (and bassoon, if desired) stands)
* = Items of which you would do well to buy a few extras


