

I thought I'd post about this method I learned for fixing broken clarinet bodies, tenons and sockets. It was "invented" by Gordon Palmer. I use quotes because although he invented it by himself, others have also invented similar methods (though I'v enever seen anyone doing it exactly like this). Similar methods are also used in other fields like e.g. construction, dentistry, etc.
This started as a repair for broken plastic clarinet joints, but can sometimes be used for broken tenons and sockets too (with small differences). I'll use some of Gordon's explanations in addition to mine. IMO this method can have, in some cases, advantages over the (more or less) traditional method of grafting a sleeve part for the joint. Not that grafting is a problem, not at all, but sometimes there can be reasons to use pinning. For example:
- A graft has what is possibly (or maybe probably) a weaker area in some length of the body wall, where two thinner walls are glued together. The pinning method doesn't compromise the strength of the wall for some length beyond the break.
- Pinning usually doesn't require a lathe and never required the expensive and specialized accessories for grafting, which some repairers (DIYers) don't have. BTW I do have a lathe and prefer to do pinning when both methods are an option. If the instrument is too big for the lathe (e.g. a lathe too small to hold bass clarinets) pinning is also an option.
- In most cases, pinning doesn't require getting stock plastic material and shaping it, even when it is a tenon or socket that is broken. When a tenon or socket is completely crushed and can't be used, the lathe work is still much simpler e.g. just the new tenon/socket, as opposed to working on the entire instrument. The stainless steel pins are (IME at least) easier to get and don't require work on them (other than cutting to length).
- When pinning properly, it is probably at least as strong as a graft and likely even stronger.
- Pinning is, in most cases, probably faster.
- Both methods rely on a length of material supporting the two broken parts. One uses a plastic sleeve and one uses pins (I use stainless steel). The pins are stronger than the graft.
- With some breaks, to avoid remaking a long length of the joints, a graft is done with sleeves at both sides. This creates two glues supports as opposed to only ever having one with pinning.
- Usually no tone holes, post holes, etc. need to be re-drilled, re-cut, re-threaded, etc.
I have to admit a couple of disadvantages. When a repairer is used to grafting, has all the equipment to do it and used to working with it (e.g. does grafting regularly for whatever reasons), then grafting is probably easier/faster instead of learning/trying a new method. In addition, sometimes grafting has a bit less visual evidence (but sometimes more).
The method itself is pretty simple to describe. Stainless steel pins are inserted into both sides of the break. They are glued in in addition to the glued joint. But there are some details that are important.
- I usually use around 1.2mm pins for broken bodies. I sometimes use different (thinner) diameter pin for tenons and sockets. I file/sand the pins lightly for even more reliable gluing.
- It is super important to drill vent holes for the pin holes. These are small holes at the previously-dead-end of the pin holes, drilled from the side. I use a 0.5mm drill for this. This allows the hole and pins to be completely covered and supported by glue. Without vent holes you will have air pockets and unreliable gluing of the pins, which can fail.
- It is important to get good alignment of the parts and the pin holes. This just needs good hand and eye coordination. I use a micromotor for drilling but you can use a drill just the same. I start the drilling with more rigid, shorter, 2.35mm shank micromotor drills. You can hold these in a drill too. then continue with normal drills. Avoid tone holes, posts, etc. In some situations there are tricks to help alignment.
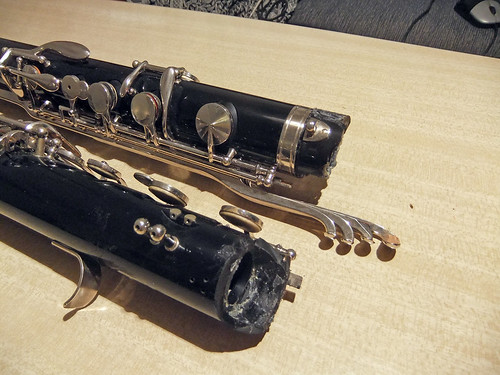
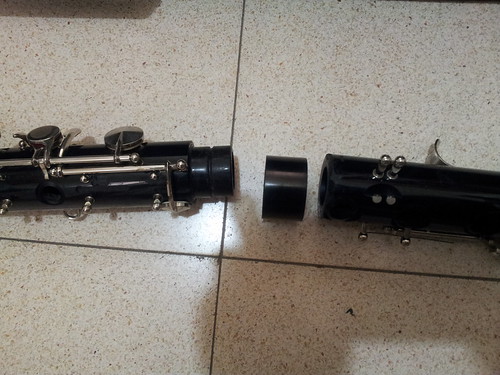
Here are some photos of an example I just did (not complete yet). Someone asked about gluing their bass clarinet tenon and socket since the socket had some cracks. Turned out the socket very end (the metal ring area) was broken and someone glued this to the tenon. The socket still got some stress and continued to crack and break.
I gave some adive and suggestions but also warning what can happen if they try to repair this themsevles, etc. A few days later I get an email titled "Clarinet repair goes horribly wrong" with these photos:
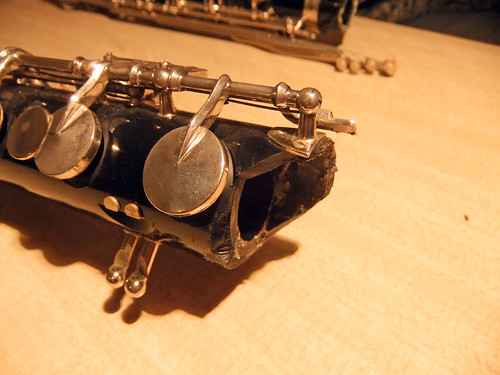
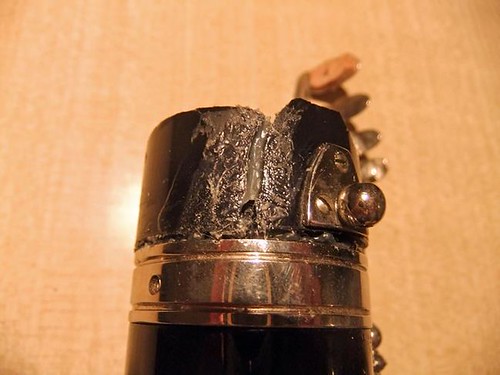
The socket was now completely ruined. The tenon, which was fine before, now had a lot of glue on it that needs to be removed. so in this situation I've used the pinning method but made a new socket since the original was unusable.
Here are the tenon cleaned from glue and the new socket partly made:
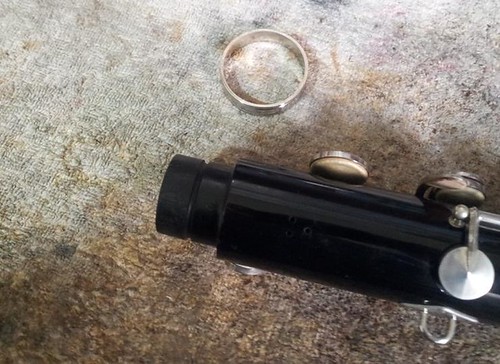
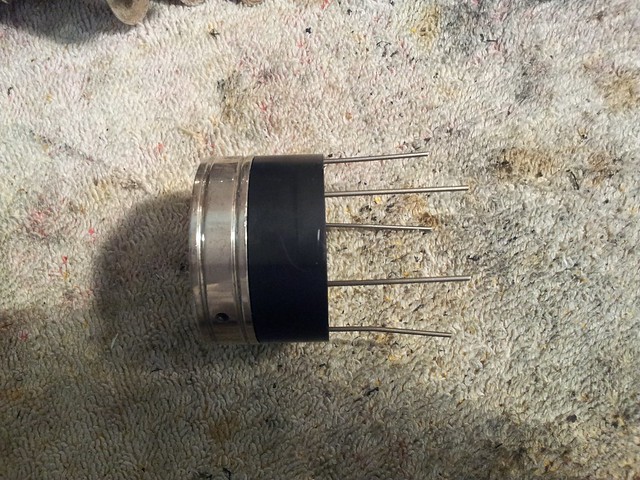
Here is the new socket with the metal ring on it and the pins sticking out (temporarily, since they will be removed before putting the glue in the holes):
This started as a repair for broken plastic clarinet joints, but can sometimes be used for broken tenons and sockets too (with small differences). I'll use some of Gordon's explanations in addition to mine. IMO this method can have, in some cases, advantages over the (more or less) traditional method of grafting a sleeve part for the joint. Not that grafting is a problem, not at all, but sometimes there can be reasons to use pinning. For example:
- A graft has what is possibly (or maybe probably) a weaker area in some length of the body wall, where two thinner walls are glued together. The pinning method doesn't compromise the strength of the wall for some length beyond the break.
- Pinning usually doesn't require a lathe and never required the expensive and specialized accessories for grafting, which some repairers (DIYers) don't have. BTW I do have a lathe and prefer to do pinning when both methods are an option. If the instrument is too big for the lathe (e.g. a lathe too small to hold bass clarinets) pinning is also an option.
- In most cases, pinning doesn't require getting stock plastic material and shaping it, even when it is a tenon or socket that is broken. When a tenon or socket is completely crushed and can't be used, the lathe work is still much simpler e.g. just the new tenon/socket, as opposed to working on the entire instrument. The stainless steel pins are (IME at least) easier to get and don't require work on them (other than cutting to length).
- When pinning properly, it is probably at least as strong as a graft and likely even stronger.
- Pinning is, in most cases, probably faster.
- Both methods rely on a length of material supporting the two broken parts. One uses a plastic sleeve and one uses pins (I use stainless steel). The pins are stronger than the graft.
- With some breaks, to avoid remaking a long length of the joints, a graft is done with sleeves at both sides. This creates two glues supports as opposed to only ever having one with pinning.
- Usually no tone holes, post holes, etc. need to be re-drilled, re-cut, re-threaded, etc.
I have to admit a couple of disadvantages. When a repairer is used to grafting, has all the equipment to do it and used to working with it (e.g. does grafting regularly for whatever reasons), then grafting is probably easier/faster instead of learning/trying a new method. In addition, sometimes grafting has a bit less visual evidence (but sometimes more).
The method itself is pretty simple to describe. Stainless steel pins are inserted into both sides of the break. They are glued in in addition to the glued joint. But there are some details that are important.
- I usually use around 1.2mm pins for broken bodies. I sometimes use different (thinner) diameter pin for tenons and sockets. I file/sand the pins lightly for even more reliable gluing.
- It is super important to drill vent holes for the pin holes. These are small holes at the previously-dead-end of the pin holes, drilled from the side. I use a 0.5mm drill for this. This allows the hole and pins to be completely covered and supported by glue. Without vent holes you will have air pockets and unreliable gluing of the pins, which can fail.
- It is important to get good alignment of the parts and the pin holes. This just needs good hand and eye coordination. I use a micromotor for drilling but you can use a drill just the same. I start the drilling with more rigid, shorter, 2.35mm shank micromotor drills. You can hold these in a drill too. then continue with normal drills. Avoid tone holes, posts, etc. In some situations there are tricks to help alignment.
Here are some photos of an example I just did (not complete yet). Someone asked about gluing their bass clarinet tenon and socket since the socket had some cracks. Turned out the socket very end (the metal ring area) was broken and someone glued this to the tenon. The socket still got some stress and continued to crack and break.
I gave some adive and suggestions but also warning what can happen if they try to repair this themsevles, etc. A few days later I get an email titled "Clarinet repair goes horribly wrong" with these photos:
The socket was now completely ruined. The tenon, which was fine before, now had a lot of glue on it that needs to be removed. so in this situation I've used the pinning method but made a new socket since the original was unusable.
Here are the tenon cleaned from glue and the new socket partly made:
Here is the new socket with the metal ring on it and the pins sticking out (temporarily, since they will be removed before putting the glue in the holes):
")