tárogató Remanufactured Part C

jbtsax

Distinguished Member
The 3rd part in this series is the adapting the keys and mechanics of the tárogató to be more like modern instruments. There are basically 5 parts:

1) Threading one of each pairs of posts to accept a threaded hinge rod.
2) Reaming the original hinge tubes and unthreaded posts to accept a slightly oversize rod.
3) Removing the thick "key dishes" and replacing them with modern key cups.
4) Replacing the springs with modern needle springs and flat springs.
5) Facing the posts and hinge tubes with or without swedging to achieve a tight and smooth action.

For those interested in detail, some of the specs will be provided in the text. For others, the pictures will tell most of the general procedures.

The original key rods were dovetailed on one end to hold them in place and measured .081". This also was the approximate size of the hole in the posts. A .088" rod was selected to replace the originals and a 2-56 thread was chosen for the new hinge rod and threaded posts.

In order to tap the post for this size thread, a .070" inch hole had to be made in the post. The easiest way found to do this was to drill the post out to .093" and insert a piece of 3/32" brass tubing (.066" ID) and solder it into place using low temp silver solder. That assembly was then drilled out to .070" the correct size to accept the 2-56 tap. The non-threaded post and the hinge tube were drilled out to .089" to accept the .088" hinge rod. A .089" reamer has been ordered since so many keys will have to be resized and the reamer will do a better and faster job than a drill bit. ("You can't drill a hole in a hole" is what I was taught.)

3Drillingoutpostforoversizerod.jpg

This photo shows drilling out the post to insert the brass tube. The post is held with a brass rod
drilled and threaded with an 8-32 thread that the rod screws into.

3Solderingbrasstubeintoposttobethreaded.jpg

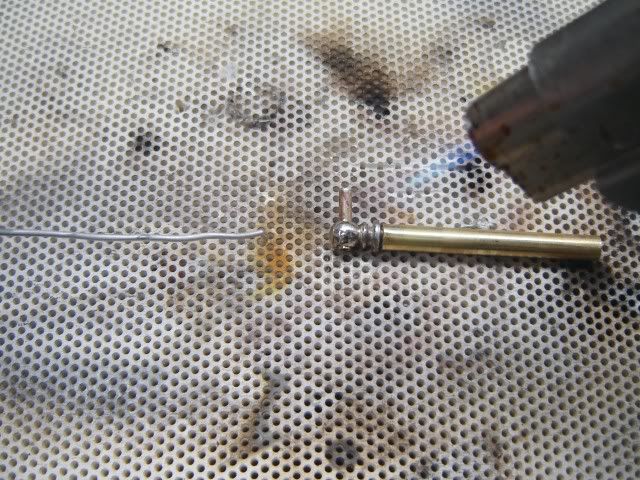
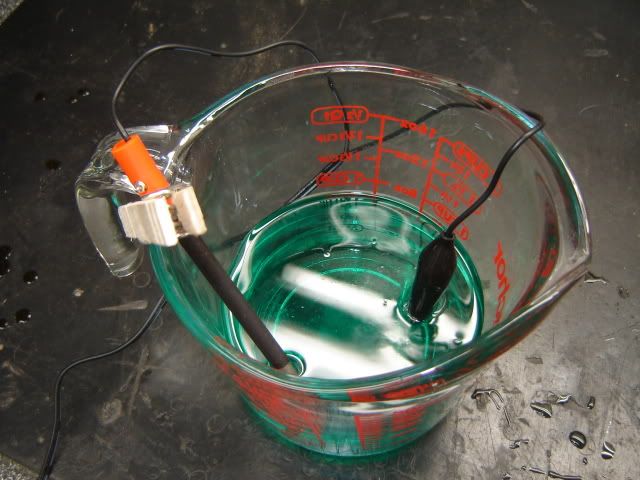
This shows soldering the brass tube into the post which was then cut off flush with the face of the post.

3Cuttingthreadsinpost.jpg

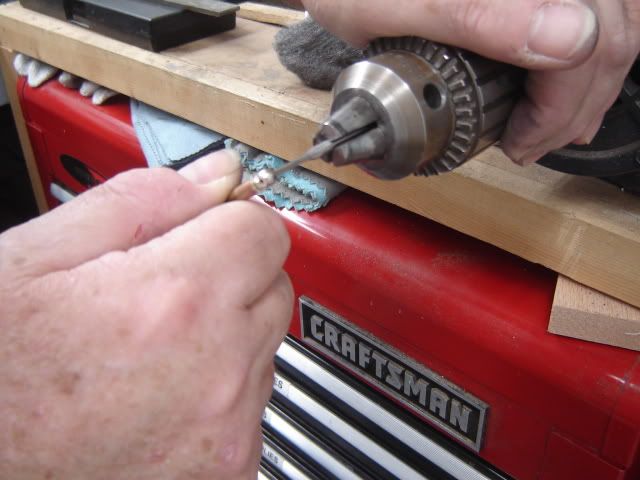
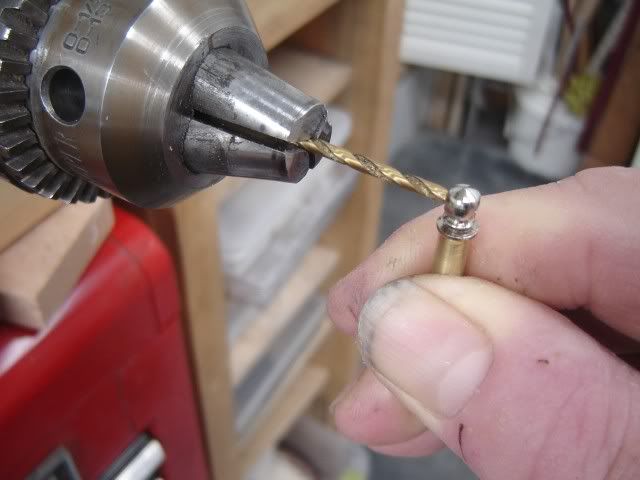
This shows the 2-56 tap chucked into the bench motor cutting threads into the post after drilling it out to .070"

3Showingthreadedrodinposts.jpg

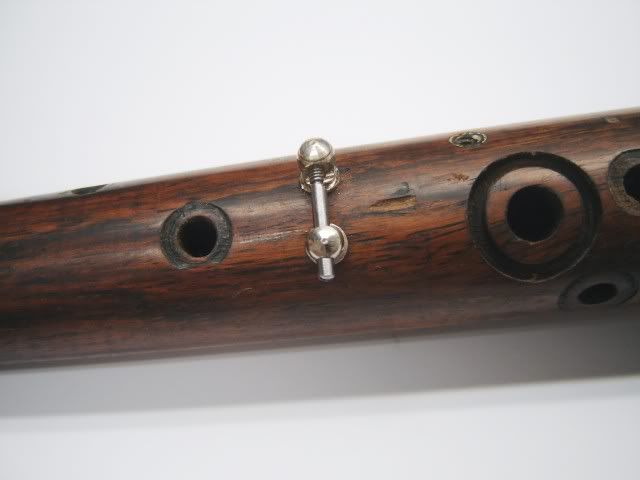
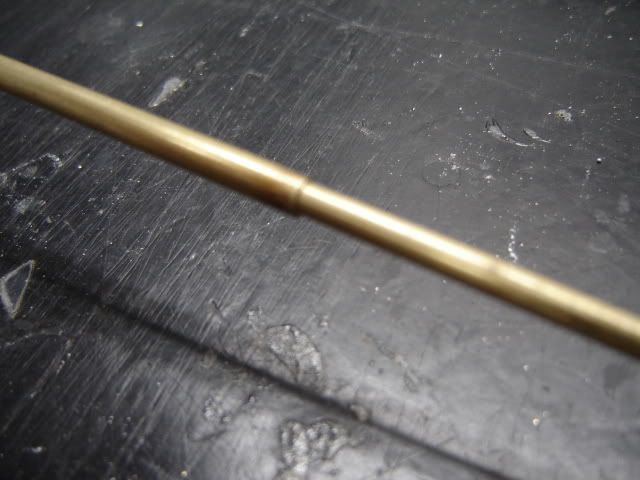
Checking the new threaded rod for fit with posts on the tárogató.

3Usinghingetubecuttertofacekey.jpg

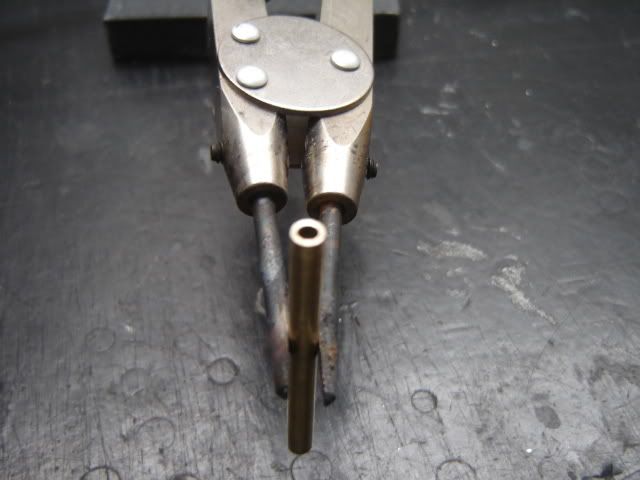
This shows using a hinge tube cutter to square off or "face" the key's hinge tube. The same tool
will be used to "face" the key side of the posts.

3Showingkeythathasbeenfaced.jpg

This shows the hinge of the key after "facing" with the hinge tube cutter.


3Tarogatokeycomparedtoclarinetkey.jpg

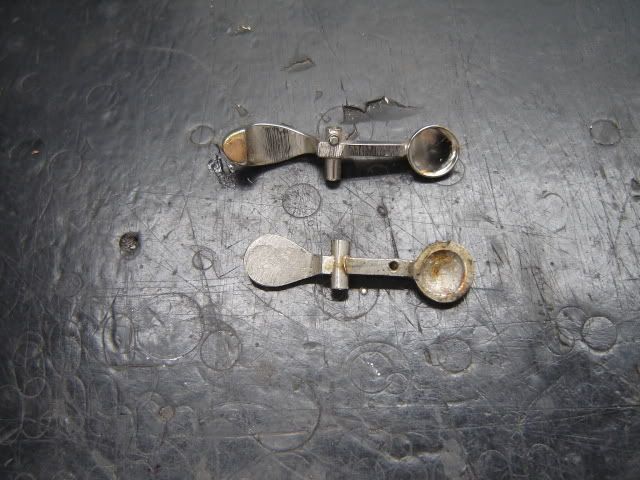
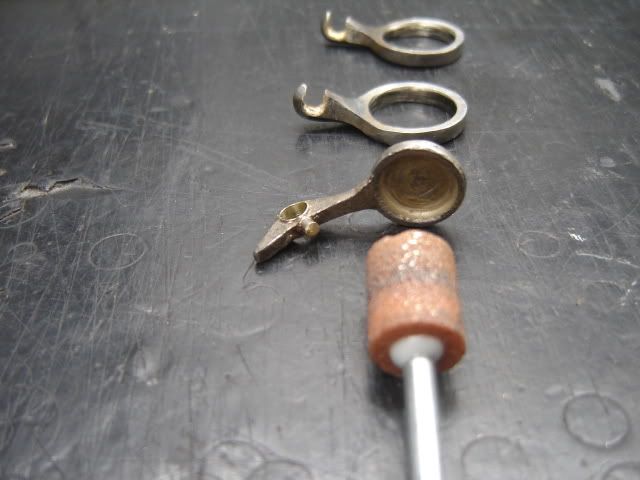
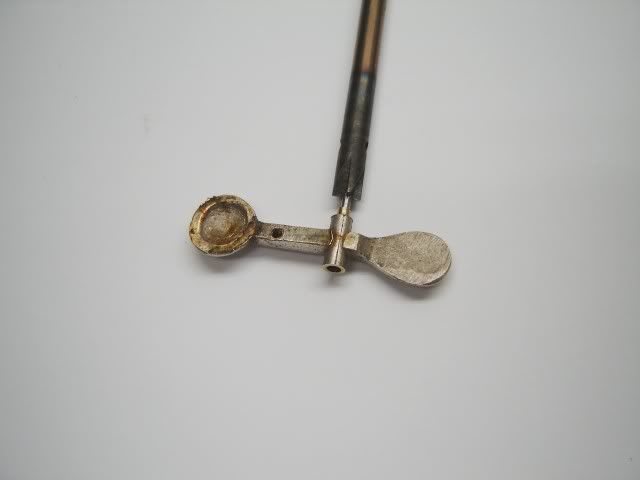
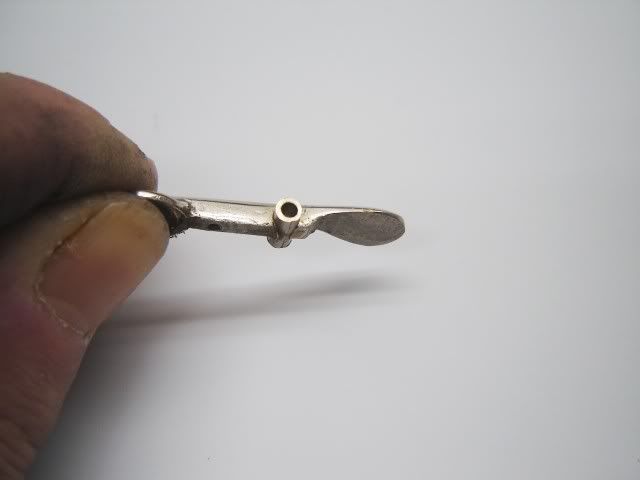
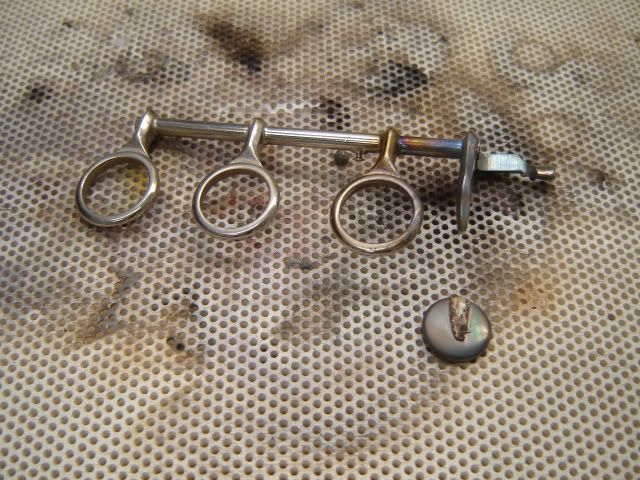
This image shows the original tárogató key and the modern key that will provide the "transplant".

3Cuttingthecupofftheoriginalkey.jpg

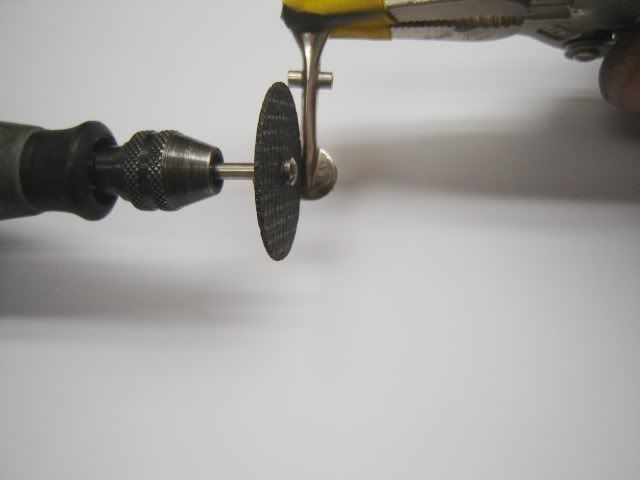
Using a dremel tool to cut off the original "key dish".

3Showingthekeywithoutthecupontheinstrument.jpg

Checking the orientation of the key on the tárogató to determine the placement of the new key cup.

3removingkeycupfromclarinetkey.jpg

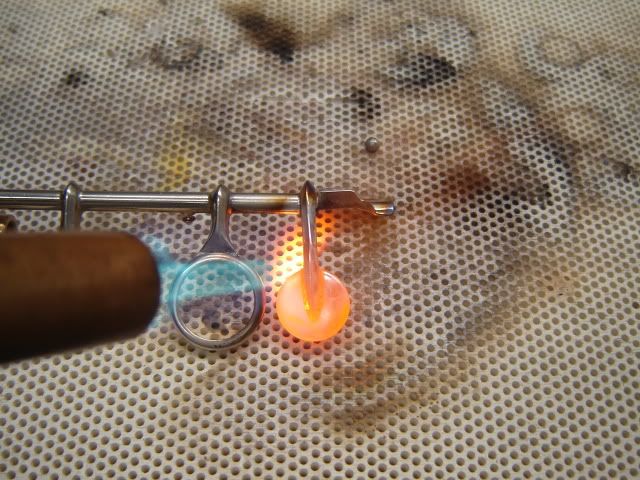
Unsoldering the key cup from one of the host clarinet keys.

3keycupunsolderedfromclarinetkey.jpg

Clarinet key cup removed and ready to be cleaned up and silver soldered, uh I mean "brazed" to the tárogató key. ;)

3Showingfinishedkey.jpg

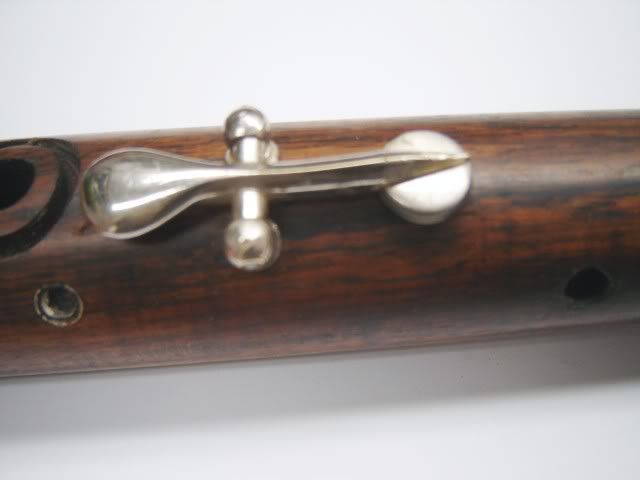
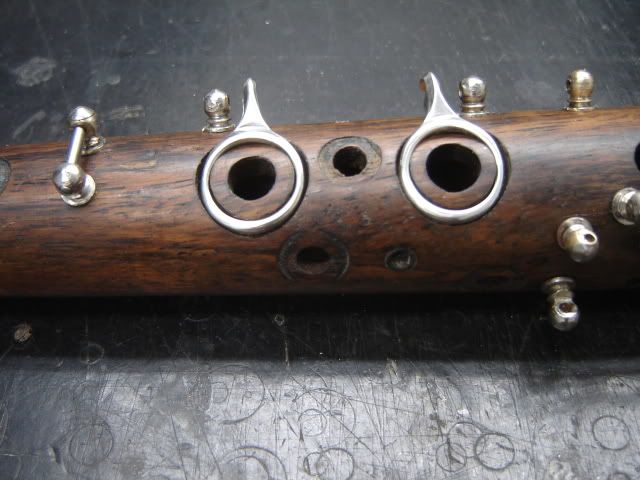
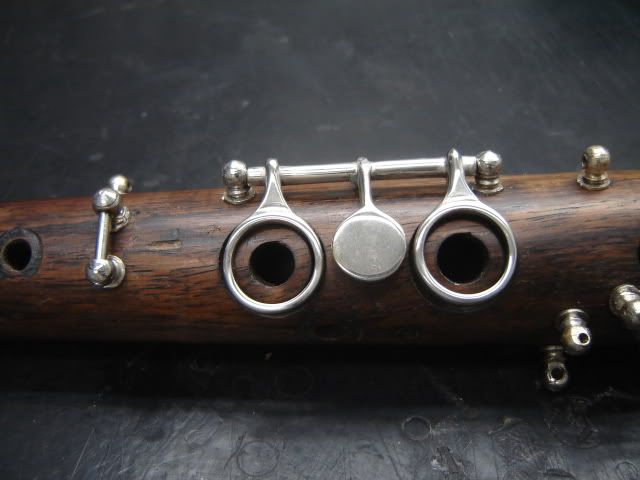
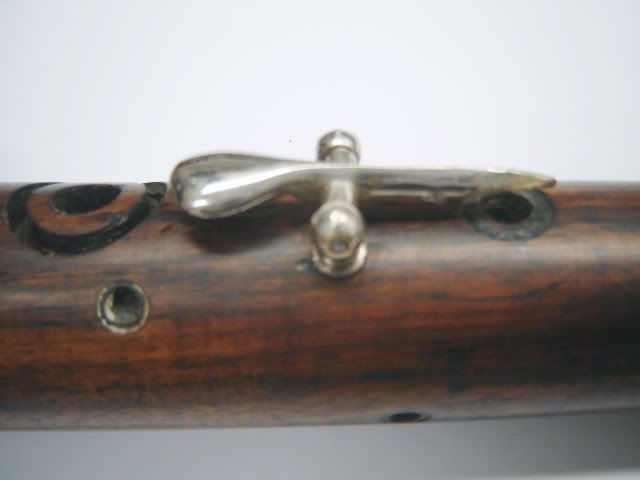
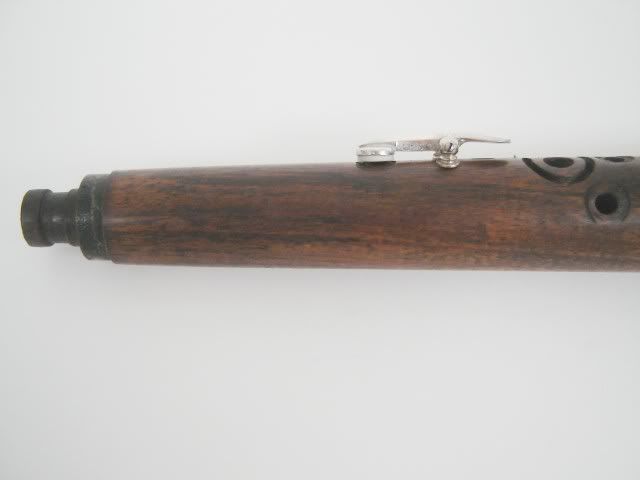
This shows the finished key installed on the tárogató.

Finishedkeywithpadsideview.jpg

Here is a side view with a Valentino synthetic pad installed.

Now that I know the procedure works, it is just a matter of taking it key by key until the keywork is finished.
I have been given a junk bass clarinet to scavenge keys from, so I an confident that I will have all of the key
cup sizes I need. I will also order a nickle plating kit from Caswell to touch up the keys.
 
Fantastic! Thanks for documenting this process John! I love it.

I guess the advantage of modern key cups over the "dishes" that the pads won't slide around and less glue is needed?

When I replaced a few pads on my taragot, I used contact cement - it's quite strong, but comes off easily when it needs to.

I think they originally used something like burnt shellac, or something similar. It's not very strong, and gets crusty.

George
 
John, what kind of torch are you using for brazing? It looks like the head of a big propane/MAPP torch. I've always had to resort to at least a MAPP/Oxy torch for brazing or else it takes too long to get the part heated up.
 
John, what kind of torch are you using for brazing? It looks like the head of a big propane/MAPP torch. I've always had to resort to at least a MAPP/Oxy torch for brazing or else it takes too long to get the part heated up.

It is a yellow tank that is labeled "Map-Pro" used with my propane torch head (without oxygen). I find it does a good job so long as the parts are not too big.
 
What about ordering key cups from a manufacturer? Anyone tried contacting eg Amati or Selmer USA for getting subassembly parts? Wouldn't that be cheaper than disassembling donor instruments?
Just a thought that crossed my mind...

Yeah I know, those factories probably aren't prepared for selling to individuals, unless you order by the hundredweight.

(Amati does, however, sell single keys, at a price that beats DIY efforts)
 
What about ordering key cups from a manufacturer? Anyone tried contacting eg Amati or Selmer USA for getting subassembly parts? Wouldn't that be cheaper than disassembling donor instruments?
Just a thought that crossed my mind...

It is hard to get much cheaper than "free". All of my parts instruments are from the music store where I used to work and have a good relationship with the owner and repair shop manager. :) :) :)

Repair shops in music stores tend to have a large "bone pile" due to the fact that they take trade ins of instruments not worth repairing when customers buy new instruments. School instruments that are well beyond their useful life are also traded in for credit on future repairs so there are typically salvageable parts for most of the common brands in the area for most types of instruments.
 
Adapting the keys on the upper joint hit a speed bump when it was discovered that the "ring" key
no longer fit. Screwing the posts in an extra turn to make them look right with the layer of black
"goop" removed caused the rings to not match up with the grooves on the body. After a couple of
failed attempts to cut the arm of the rings and re-solder at the correct length, it was decided that
building a new key would be the way to go. The pictures that follow outline the process which
took a great deal of time to perfect.

A new hinge tube was needed and unfortunately no clarinet keys have hinge tubes long enough
for this purpose. The photo below shows the "telescoping" brass tube that was used soldering one
piece into another to provide the correct thickness.

Ringkeybrasstubing.jpg


This photo shows the finished hinge tube that fits the hinge rod size selected for the keys.
Holding the brass tube is one of the two jeweler's "3rd hand" holding jigs purchased for this project
because of the large amount of silver soldering required. I don't know how I ever soldered without
them now. They work great and withstand the high temperatures necessary for brazing.

Ringkeyhingetube.jpg


These are the parts that will make up the new key. The original touchpiece that also doubles as
a pad holder was made into a real "key cup" using a grinding barrel with a dremel tool. The rings
were salvaged from a donor clarinet key chosen for their thickness.

Ringkeyparts.jpg


The diameter of the rings was not large enough to fit the taragoto, so they were enlarged using
the jeweler's technique of tapping around the circumference while inserting progressively larger
metal cylinders inside the hoop.

Ringkeyenlargingring.jpg


The next picture shows checking the fit on the body of the instrument.

Ringkeycheckingfit.jpg


I'm jumping ahead here since there were many intermediate steps fitting the rings, key cup, and
making a new key foot that involved many ticky back and forth steps. This shows nickle plating
the finished and polished key using Caswell's nickle plating kit, also purchased for this project.
Nickle plating is much easier than silver plating because it requires no clean up or polishing after
the process.

Ringkeynickleplating.jpg


Finally here is the finished key as it will look installed on the taragoto. Hopefully the keywork will
progress at a faster rate since there are no more rings to deal with.

Ringkeyfinishedkey.jpg


My "shop assistant" Toby checks in on my work from time to time to make sure I am on task. :)

RingkeyhelperToby.jpg
 
I have finished the key work on the upper joint, and am starting the lower joint. On the taragoto I have the thumb lever for the bell key is far below the thumb rest. What I need is a photo or two of a "good" taragoto lower joint showing the back so I can determine what needs to be done to reshape the lever to be more functional. None of the photos on the WWF I have found shows this detail that I need.

I will have some photos of the finished key work on both joints in a few days.

John, my understanding is that the bottom note is rarely played. It's the same deal in mine - really impractical to operate that key, it's really far from the thumb rest. Once you figure it out, I'd like to copy your work:)

By the way, I was inspired by your work, so last night I addressed my mouthpiece tenon irregularity (I mentioned this in a separate thread). I used ebony powder and super glue to fill in missing areas. But then, out of curiosity, I took some measurements, and found out that I, too, have about 4-5mm gap between the bottom of the mpc mortise and the top of the tenon. Toby mentioned before that filling that gap made no difference on his taragot, but since I was already messing around with superglue, I decided to fix it.

I made a thin ebony extension, drilled it, and simply superglued it on the top of the tenon. Today I'll trim everything to size, use superglue+ebony dust if there are still any inconsistencies, and once all that is done, I'll smooth everything with steel wool. I'll post pictures when I'm done.

George
 
Sorry I can't take a photo at the moment but on my Stephen Fox instrument that key goes a little to the left of the thumb rest. It's still not particularly easy to use though.

I've seen TIMIS instruments where it actually goes to the right of the thumb rest making it difficult to avoid pressing it! One player I met always disconnected it for that reason.
 
Thanks for the photo. That has given me some ideas. The "automatic" octave system on that instrument is quite interesting. It appears from the photos that this taragoto has the more modern threaded hinge rods rather than the "wires" bent over on the ends that are typically found on these instruments.
 
My Reményi has a horrible thumbrest but an excellent thumb key. IIRC it is basically like yours: a long straight key that pivots on an axle perpendicular to the body (like a seesaw). The difference is that the touch extends to just under the thumb, and can be actuated without moving the thumb. I'll try to post a pic tomorrow.

Interestingly, the Stowasser pivots along the body (like that Sternberg), but the touch is far down the body, making it very clumsy.

The Stowasswer has some of the nicest keywork I have seen on any woodwind, but it also uses unthreaded pins. I must say it freaked me out at first--seemed really cheesy--but it works pretty well, and saves you the fear of frozen threads and mangled slots.

BTW, there is a diameter jump at the middle tenon on the Stowasser--so you are in good company ;-)

Toby
 
My Reményi has a horrible thumbrest but an excellent thumb key. IIRC it is basically like yours: a long straight key that pivots on an axle perpendicular to the body (like a seesaw). The difference is that the touch extends to just under the thumb, and can be actuated without moving the thumb. I'll try to post a pic tomorrow.

Thanks. That would be helpful.

The Stowasswer has some of the nicest keywork I have seen on any woodwind, but it also uses unthreaded pins. I must say it freaked me out at first--seemed really cheesy--but it works pretty well, and saves you the fear of frozen threads and mangled slots.

I have since come to learn that even well made bassoons have this type of keywork. It seems to be traditional on some instruments. I think that I made the right choice in converting mine to threaded rods and posts since the keys were very sloppy and loose to begin with. It appears from the photos that the modern tarogoti made by Stepen Fox also have modern threaded rods and posts.
 
John, here are some pix of the thumb keys on my tarogatok. As you can see, the thumbrest on the Remenyi is horribly small, but the key is positioned perfectly. The tip rests just under the bottom edge of my thumb, so I can simply roll my thumb down (without having to lose contact with the thumbrest) to close the cup. The second pic show the linkage at the bottom.

The Stowasser thumbrest is very comfortable (at least compared to the Remenyi) and the key is a work of modern art, but it is much too far down to actuate easily. You have to actually remove your thumb from supporting the instrument and slide it down to reach the key. Pretty stupid, IMO.
 
Thanks. That would be helpful.


I have since come to learn that even well made bassoons have this type of keywork. It seems to be traditional on some instruments. I think that I made the right choice in converting mine to threaded rods and posts since the keys were very sloppy and loose to begin with..

I have an old Albert system clarinet with that style of keywork. I think it's a Viennese instrument. I bought it at a flea market in Vienna and I seem to remember it says Wien on it somewhere. It's kind of playable but hangs on the wall because has a broken Eb/Bb side key and it's pitched in B natural. Well, either that or it's a very very high pitched Bb. It has an amazing sound like old New Orleans jazz.

It appears from the photos that the modern tarogoti made by Stepen Fox also have modern threaded rods and posts.

Yes, mine does.
 
I might try to fix that broken key. I repadded it successfully a few years ago but at the time didn't have a clue how to fix the key. Having seen these tárogató threads I now have at least some idea. What chance do you think a complete first timer would have of successfully soldering an extension on?
 
Back
Top Bottom