How to hold a mouthpiece in the lathe. Part 1 of 2
Thanks for the input on getting the tárogató to play the low notes more easily. There was interest in how to hold a mouthpiece in a lathe, so here is some info on how I managed it.
To enable turning a new socket in a soprano sax mpc to fit a tárogató, the mpc was held so the axis of the socket was coincident with the lathe's axis. The same technique can also be used, for instance, for enlarging the bore on a clarinet mpc, or for moving the shoulder on a clarinet mpc so the tenon is effectively longer. We will use a low-melting polymer to hold the mpc inside a metal cylinder that keeps it aligned in the lathe. A mandrel will align the mpc in the lathe while the polymer freezes inside the cylinder and supports the mpc during the turning process.
Measure the inside diameter and taper using telescoping ID gauges. The mpc to be modified had a taper of 1/2% or 0.30 degrees on each side of the axis. This was found be determining the ID at the opening and the ID as far as possible inside the mpc. While the gauge is at its deepest position in the mpc, put a pencil mark on its shaft. Remove the gauge and measure the distance between the pencil mark and the contact line of the gauge, which is where it actually touched the ID of the mpc. The difference in IDs, divided by the distance between the two IDs, divided by 2.0 is the tangent of the taper angle. The ARCTAN of this number is the taper angle in degrees. I obtained ARCTAN( 0.005) = 0.30 degrees.
Make a mandrel that fits the original mpc socket. This piece will be used to align the axis of the mpc in the lathe and to provide a handle. Take a piece of aluminum or brass rod larger in diameter than the largest original ID of the mpc socket, [dimensions] chuck it in the lathe and set the angle head slide on the cross feed of the lathe to that same value - in my case 0.3 degrees. You probably can't determine this very accurately, but you can get a better fit by trial and error. Cut a taper on the metal rod, using the angle head slide, that is at least as long as the depth used to determine the angle of the mpc taper. Smooth the surface of the taper with a file and emery paper - any ridges left on the surface will act like barbs and the mandrel will stick in the mpc. Trial-fit the mandrel to the mpc. It should go in nearly all the way to the chamber/bore junction in the mpc. In my photo, the other end of the mandrel was reduced to 1/2" to fit inside the tailstock chuck. The mandrel will appear in Part 2.

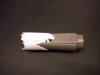
Mouthpiece standing in metal tube.

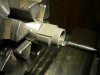
Lathe angle head set to 0.3 degrees.
Get a piece of metal tubing that will just enclose the mpc. I'll call it a form. In my photo, the tube is not quite large enough to accept the entire mpc, but it is close enough. It should be about as long as the mpc. Clean the tubing up with the lathe.
Purchase, beg, or borrow (don't steal any - it is cheap) some polycaprolactone ("PCL") beads. See
http://en.wikipedia.org/wiki/Polycaprolactone . This polymer is available under various names including "Friendly Plastic" and "Instamorph". McMaster-Carr calls it "Mold-Your-Own Grips." See
http://en.wikipedia.org/wiki/Polycaprolactone . It is a biodegradable plastic that melts at about 60C (just uncomfortably hot) and refreezes to a very tough white solid. It does not stick well to metal, but I found out the hard way that it sticks VERY well to the Rico Metallite plastic mpc. Cover the ENTIRE mpc, where it might touch the melted PCL, with thin transparent tape so the PCL won't stick to it. The PCL is reusable indefinely. Because you don't need much, people might want to purchase some, divide it up, and share.
Stand the mpc upright on its socket end on a piece of scrap sheetmetal and place the form over it. Drop in enough PCL beads to cover the beak end of the mpc plus a little. Place the sheetmetal, form, mpc, and PCL in an oven preheated to 70C (158F). My home oven has a digital thermostat that can be set that low. A hot air gun will work if you are patient. Another way that might work is to close the socket end of the form/mpc combo with tape and set the combo in a dish of hot water on the stovetop. Do not boil the water, but watch the PCL beads in the top of the form to see that they melt - they will turn from cloudy white to clear when they melt. The PCL melt is very very viscous, but the the beads will droop and fuse, and in about an hour the melt will conform to the shape of the mpc. Push the melt down gently, if necessary. You are just trying to fill a lot of the space between the form and the mpc where the table and beak are. It is so viscous it probably won't run out the socket end of the form.
Remove the form/mpc/PCL assembly from the heat and, While the PCL is still melted, put the mandrel into the socket and place the form/mpc/PCL/mandrel assembly in the lathe. Clamp the chuck jaws lightly onto the form and move the tailstock chuck into place, then tighten the tailstock chuck lightly on the mandrel. If your tube did not completely slide down over the mpc, as in my photo, pull the mpc out of the form slightly so it is not touching the form. The two chucks will keep the form and the mandrel aligned on the lathe axis simultaneously, and the mandrel will keep the mpc's original socket on the axis while the PCL refreezes. Wait about an hour so the PCL has completely solidified.

Mouthpiece with yellow tape (beak end) and frozen PCL polymer.
End of Part 1 of 2.
-Captain Simion

")

.JPG")

