Untitled Document
     
Advertisement Click to advertise with us!
     

Buying a new (used) Clarinet & What to Look for and Fix

John,

That is a point that I did not include.

On older instruments where the arm for the crows foot (the arm from the bottom of the C key to the crows foot) is thin compared to todays it could have been taken out of whack more easily than (most of) todays clarinets. Look at a modern Buffet and compare it to a 1940s Buffet as the thickness difference is large.

to "un whack" it I push down on the C touch and use a thick screwdriver as a base for the crows foot to be pushed against. But more than likely the curve of the crow's foot arm is incorrect and that needs adjustment too.

Bending the spatula touches is another option but I tend to want to keep all the angles of things intact and level with each other. Truthfully, I don't have the time constraints of a music store dealing with rentals so I can be a bit more picky.
 
John,

btw I stopped using Corel Draw on version 6.x
I do have Photoshop Elements v2 on my laptop which I haven't really used until now for the arrows. I've been getting by on Paint for a long time.

case in point .. look at this arrow done in paint. I figured I might as well figure it out in Photoshop Elements after that.
picture.php
 
Cool article and photos! I think I do some things a bit differently and I will post about it later.

The "quick fix"...

The other quick and dirty trick...
I disagree... that these are "quick and dirty fixes" :)

In general I think the best approach is to analyze the mechanism. What each part should do? Is it doing it? Can it do it better? How is it possible to make it do it better? What is the best approach to do that in this case? etc. etc.
If the result is stable and reliable, there's is nothing "dirty" or "tricky" about it. Just because it is quick isn't a disadvantage!

I often use just my fingers and sometimes various tools to adjust/bend keys in this area. I will bend when I think this is the best approach, which is most of the time. It's just important to bend in a way that the parts you want to bend will actually bend, that they bend where you want them to bend and that they are in a stable condition after the bending (by bending back, how much depends on the feel of the metal for each clarinet/mechanism).


I'm connfused re your second "quick fix".
The other quick and dirty trick that works on most clarinets to lower the C# touch if it is too high creating lost motion before it hits the crow's foot is to open the key using the RH touch piece and whack the spot it attaches to the RH lever sharply with a delrin or rawhide hammer. If it is too low preventing the B key from touching the crow's foot you simply put the pad slick between that pad and its tonehole and bend the lever up slightly with your fingers.
the F#/C# touchpiece is where you press, I think we both mean the same thing. But what do you mean by "the RH lever"? The "levers" are for left hand only.

Did you mean LH lever and "whack" the linkage arm where it connect with the LH lever? If that's the case, there's a problem since the hinge is stopped by the key (pad). This will usually result in the same "double action" remaining or if this linkage arm is bent too low, so the lever touches the body, then the pad might not close. This is when it is a pin linkage for the lever. It can work for a stepped linkage, if the key itself is staying adjusted in relation to the linkage arm, which isn't possible to control while doing that (so bending other things later might be necessary too).

If you meant something else by "RH lever" then I don't understand what it was...?

The main "method" I use for this "double action" is to simply press my right thumb on the F#/C# key and left thumb on the F#/C# touchpiece, often back a forth until it is adjusted and in a relxed and stable condition. If the linkage arm needs to be lower I press the touchpiece and tap the linkage arm, which will not usually affect the adjustment of the touchpiece and the crow's foot, but some more adjusting of all these parts might be needed to have all three aligned the way you want.
 
Thanks Nitai for pointing that out. That proves somebody reads my posts to check for accuracy---even if I do not. :)

What I meant to say was:

"open the [C#/F#] key using the RH touch piece and whack the spot it attaches to the LH lever sharply with a delrin or rawhide hammer."

The expression "quick and dirty" is one I picked up in our shop for the fastest way to get the problem solved without undue regard for the cosmetics---such as on a used and abused student instrument or poor quality I.S.O.

I'm looking forward to comparing your ideas and techniques with Steve's and my own. I'm always open to trying new ideas.
 
What I meant to say was:

"open the [C#/F#] key using the RH touch piece and whack the spot it attaches to the LH lever sharply with a delrin or rawhide hammer."
In that case, there's the problem I described here:

Did you mean LH lever and "whack" the linkage arm where it connect with the LH lever? If that's the case, there's a problem since the hinge is stopped by the key (pad). This will usually result in the same "double action" remaining or if this linkage arm is bent too low, so the lever touches the body, then the pad might not close. This is when it is a pin linkage for the lever. It can work for a stepped linkage, if the key itself is staying adjusted in relation to the linkage arm, which isn't possible to control while doing that (so bending other things later might be necessary too).
There's a mistake here. The end should be "if the key itself is staying adjusted in relation to the touchpiece, which isn't possible to control while..."

If any of this is unclear let me know and I'll try to explain it better.

This is the reason I press the F#/C# touchpiece and F#/C# key cup to adjust this. I often use the method you described for the E/B key, which is resting on the linkage arm conncted to its LH lever. So I don't really understand how what you described will adjust the height of the F#/C# touchpiece in relation to the crow's foot, unless it's a stepped linkage plus the coincidence that it bends seperately from the key itself (IME doesn't happen...).

The expression "quick and dirty" is one I picked up in our shop for the fastest way to get the problem solved without undue regard for the cosmetics---such as on a used and abused student instrument or poor quality I.S.O.
It is possible to do this without any cosmetic damage. It is fast and good and often the best method to adjust the height of the E/B key. I use it on all levels of instruments, just being careful not to do any damage (a slightly soft hammer, etc.).
 
Last edited:
I'm just adjusting this area on a clarinet, so I took some photos and can explain my "methods". I use quotes because I don't really follow a specific method that I was taught etc. I use the "method" I described, analyze the mechanism, see if it does what it should, if it can do it better, how best to make it do it better, etc. I imagine a lot of things are pretty similar if not the same as what Steve, John or someones else does. Some things are obviously fast and almost automatic because you've done it many times, but in general this is the approach I use for every adjustment including this one. So this is an example, FWIW...

First is the Ab/Eb key. I glued a material that I prefer and with more than "necessary" size for the reason descriped in a previous post. The thickness of the material here is determined by the position of the key. It's essentially like thickening the touchpiece itself. So the thickness is chosen to put the touchpiece at the best height when open/close with the amount of key opening I want. If a "too thick" material is required then I bend (call it align or straighten if you prefer) whatever part that is necessary (touchpiece, key, stop post) to allow the key to use the thickness I prefer. This will give the position I want with the thickness of material I want.

7692560818_a1a23c656b.jpg


Pretty much the same for the crow's foot. I use the material and thickness I consider best for this situation. In this case thin synthetic felt, because it's a good anf firm material for this adjustment but also pretty quiet (quieter than rubber-cork/tech-cork). Same as the Ab/Eb key, if a too thick or too thin material is necessary then (if possible, almost always is) I align the parts so the material I want will work.

7692561360_e609941852.jpg


The following photo doesn't really show it but after this, when F/C, F#/C# and E/B were on the clarinet, there was double action between the E/B touchpiece and the crow's foot.

7692560332_21eeb3062c.jpg


Sometimes the F/C key will hit its LH lever linkage first, but this is not the case here because 1) this linkage doesn't have its material glued to it yet and 2) the crow's foot is touching the F#/C# touchpiece, just not the E/B touchpiece.

So there are two options. Loweing the E/B touchpiece or raising the F#/C# touchpiece.

The former can be done by John's "quick and dirty trick" :) 
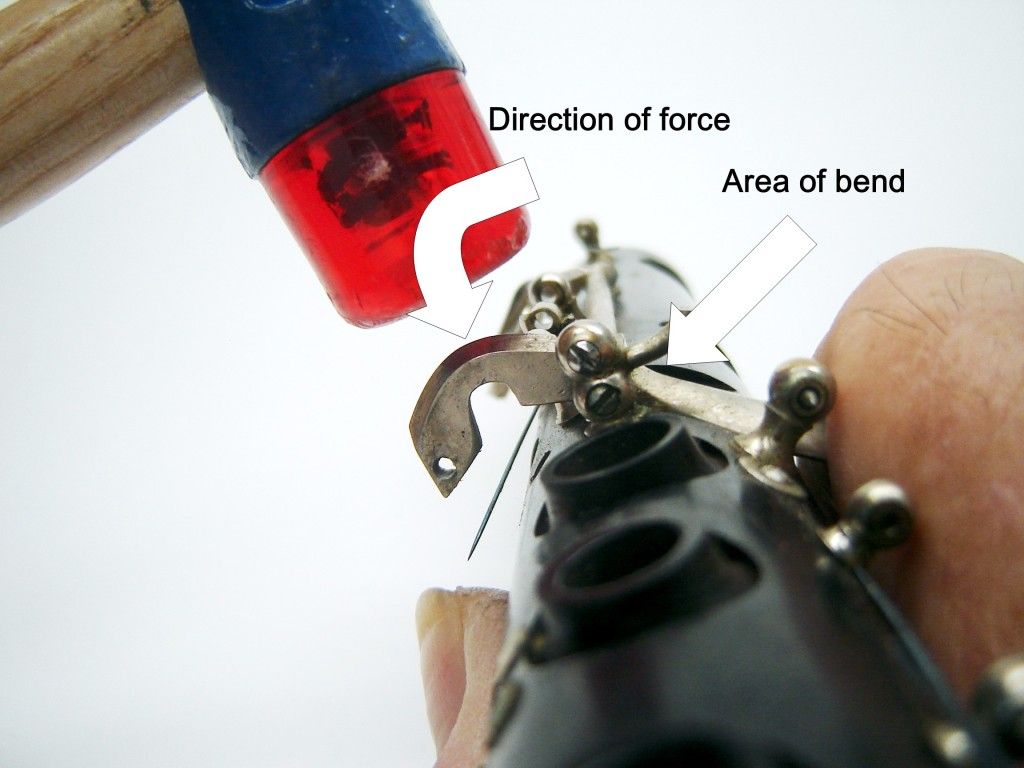
(which is as good as any method!) or by adding (replacing with thicker) material to the bumper of the E/B key (shown in next photo). IMO replacing the cork and sand to thickness has no advantage. It's significantly slower and is not more accurate, often less (one extra slide of the sander or pressing a fraction too much with and it's too late and need to be done all over again). Bending here will not damage anything. It is so much faster and at least as precise if not more.

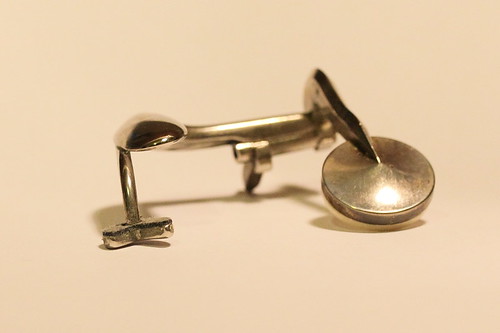
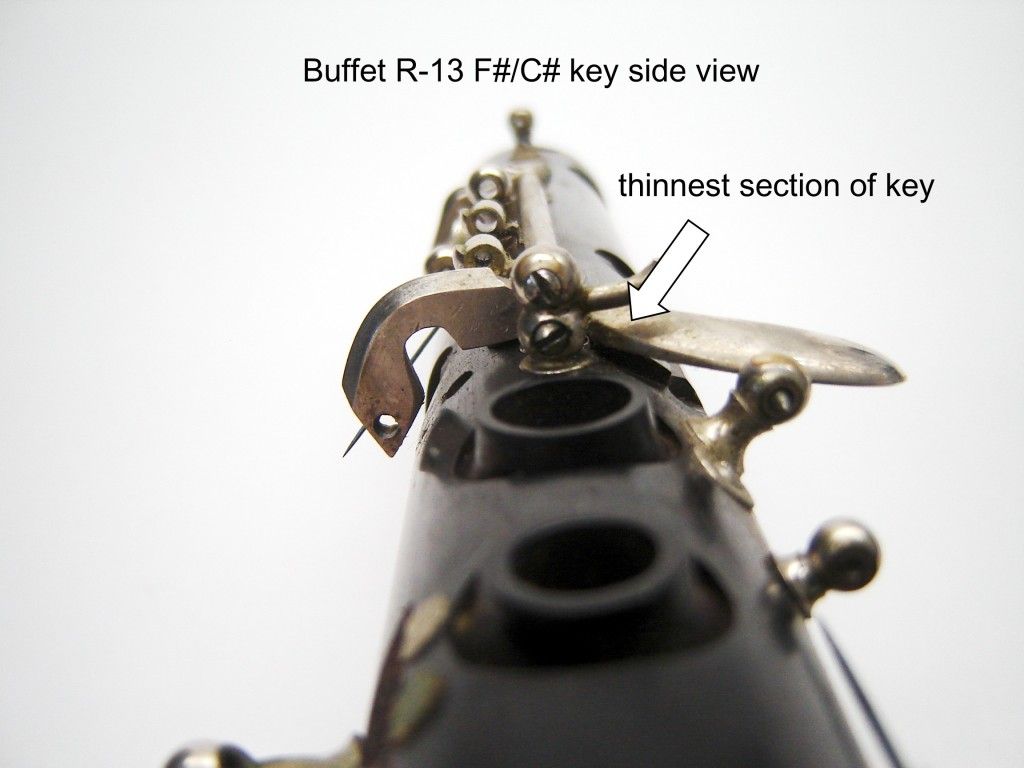
The latter can't be done by the "quick and dirty trick", as explain in my previous post. The next photo shows how the F#/C# key linkage arm has no bumper and is not touching the body, so raising or lowering this part (in relation to the touchpiece) will have no effect on its (the touchpiece) height. The bumper here is the pad itself, so the touchpiece needs to raise in relation to the key (pad). Either raising the touchpiece itself or raising the key would work, though often it's a combination and when bending in this it is the hinge rod that will twist. Regardless, it will work accurately with no issues.

7692559776_fb6ecd1b48.jpg


There is one main difference between the two methods. Lowering the E/B touchpiece (and its key with it, though this doesn't matter for now) will do nothing except that. Raising the F#/C# touchpiece will also lower the F/C linkage arm that is resting against the linkage from the F/C LH lever. I wanted them to be closer regardless, so I chose the latter method, which also put the F/C lnkage arm in a good position. It is possible to lower this linkage arm in relation to the F/C key and touchpiece, but is more difficult. It is easier to raise both E/B and F#/C# touchpieces to achieve the same thing. The difference is the position of the touchpieces, but often the differences are so small that any reason other than using the simplest method (i.e. easiest to achieve accuracy) is insignificant.

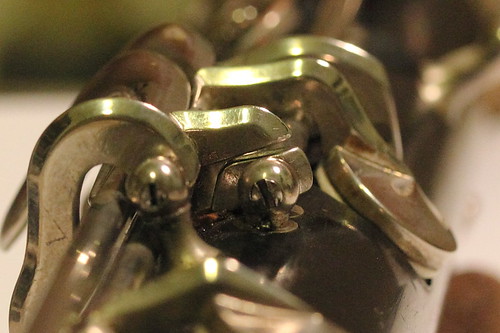
The next photo shows the F/C key to lever linkage. On many clarinets, including this one, there are mainly two problems.
First, the design of the linkage itself is not great. Optimally it should work like gear teeth. It's sometimes possible to make it this way but usually requires very dastic changes that are rarely worth the effort. This will have the least friction between the linkage arms.
Second, the operating arm has a corner that raises the key. This digs into the material glued to the key side the linkage, which can eventually cause noise, double action, etc.
Another issue that is that often a poor choice of material is used. In this case regular cork was used and was completely chewed by the corner.

I smoothed the corner to have a small curve. Be careful not to curve it too much. Because the corner (now curve) is the part actually touching the other side of the linkage when pressed, curving too much will make the travel too long and uncomfortable to play. The photo shows the curved corner and also the linkage before F#/C# was raised to also allow a smaller gap.

I prefer to use a thin material here, usually up to 0.5mm. What I like best for this is synthetic microfiber imitation leather which is just under 0.3mm. This material is incredibly quiet for its thickness (I often use it under throat G# adjustment screws). In this case this material was just slightly too thin, so I used a part of a 0.3mm rubber-cork (aka tech-cork) that was actually much thinner, under 0.2mm (just from uneveness of the material) and glued the microfiber over it.

7692559108_573c6e343b.jpg


One problem is where the gap here is too big even after adjusting the keys to reduce it as much as possible (by raising F/C LH lever and raising F/C key). I don't like to use a thicker material for this unless it's a cheap budget repair. Sometimes I solder a small silver sheet using tin/silver solder, or just add tin/silver solder to the linkage and shape it (it's pretty fast).

Maybe this will give some ideas.
 
Oooh, oooh, oooh, a new material to try. Where do you get synthetic microfiber imitation leather? I will have a response in more detail about the techniques described in this excellent presentation when I have more time to do so. Good photos and very clear descriptions. One would never guess that English is not your native language.
 
This is the reason I press the F#/C# touchpiece and F#/C# key cup to adjust this. I often use the method you described for the E/B key, which is resting on the linkage arm conncted to its LH lever. So I don't really understand how what you described will adjust the height of the F#/C# touchpiece in relation to the crow's foot, unless it's a stepped linkage plus the coincidence that it bends seperately from the key itself (IME doesn't happen...).

I have used the "quick and dirty" to lower the F#/C# touchpiece on several occasions. The photo's below will show (I think) how it works. That said, I can see where your method is better and more effective IF you press down on the rib (spine) of the F#/C# keycup so as not to bend the keycup when you exert the pressure. It is better because you have more leverage and twisting the relatively long hinge rod requires less force than bending the key touchpiece where it connects to the key.

LoweringFCleversideview.jpg


When force is exerted on a key, it will generally bend at it's weakest point.

LoweringFCleverhammer.jpg


As indicated in a previous post the relationship between the key linkage arm and the key cup remains unchanged, but the touchpiece is in fact lowered by the slight bend where it attaches to the key. Depending upon the hardness of the metal, it takes considerable force with the hammer to effect this bend. I plan to adopt the method you described, since it is more logical and takes less force to accomplish. Thanks for the new tip. :)
 
Hi John

I hope you don't mind me editing your quotes a little in a way that makes it easier for me to reply to them.

I have used the "quick and dirty" to lower the F#/C# touchpiece on several occasions....... As indicated in a previous post the relationship between the key linkage arm and the key cup remains unchanged, but the touchpiece is in fact lowered by the slight bend where it attaches to the key.
That's the critical issue. IME that relationship can and sometimes does change. On many models (including Buffet R13) it is sometimes (of even often) the linkage arm that bends in relation to the hinge. This area is not necessarily stronger than the touchpiece, but it has a slightly longer lever which can make it less resistant to force eventhough the metal itself is thicker/stronger.

One time I did it and the linkage arm bent to become a new stopper, so the pad itself didn't close anymore. This shows that it is the linkage arm that bent (in that case at least) in relation to the key cup/arm (though this extreme was on a pretty lousy clarinet...).

For the clarinet in my example, which is also a Buffet R13, I first tried to raise the F#/C# touchpiece by simply trying to raise it, while putting a pad slick under the linkage arm and using both linkage arm and key cup as stoppers, giving more force to bend the touchpeice higher. It is basically your example in reverse. With a lot of force, it barely moved (and I'm pretty strong... :)).

That said, I can see where your method is better and more effective IF you press down on the rib (spine) of the F#/C# keycup so as not to bend the keycup when you exert the pressure.
It doesn't really matter where you press, just try not to press on one of the key cup sides I guess. I just press on the entire key cup and its arm area and do it carefully so what I want to bend will bend where I want it to bend.
In my example, I raised the key cup by supporting the touchpiece with my fingers and raising the key cup with my fingers too. This created a twisting motion on the rod between them. It didn't seem the touchpiece itself moved at all in relation to the hinge. It was pretty easy with fingers alone, where trying to bend the touchpiece itself was very difficult.

I plan to adopt the method you described, since it is more logical and takes less force to accomplish. Thanks for the new tip. :)
Cool thanks :)
It's also faster since you don't need anything but your fingers usually and has a lot more control (which also makes it faster in only bending closer to the amount you want).

Re the microfiber imitation leather, I got mine form someone, not a supplier. I know Music Center has it, but I can't find it in their online catalogue. I know Kraus Music has it (he gets it from Music Center AFAIK).

There are two colours, white and brown. Regardless of colour, the texture is slightly different, the white being a bit smoother than the brown, which is a bit more grainy. The brown is also about 0.25mm and the white seems slightly thicker, maybe something like 0.28mm.

Music Center used to make pads with this instead of leather (which IMO are better) but now only make them special order, since they are too expensive and non-traditional for many.
 
Last edited:
Back
Top Bottom