John, can you please take more photos of those Ferree's pliers from other angles? They look different fomr the ones I have and about to modify to work. From stock they don't work so well. The ones you have seem different but hard to say, the light and angle make it unclear.

| Advertisement |  |
Click to advertise with us! |
You are using an out of date browser. It may not display this or other websites correctly.
You should upgrade or use an alternative browser.
You should upgrade or use an alternative browser.
Specialized key adjusting pliers
- Thread starter clarnibass
- Start date
Here is a link to several photos in my Photobucket Album. Hope this helps.
http://s162.photobucket.com/albums/t251/jbtsax/Ferrees Pliers/
http://s162.photobucket.com/albums/t251/jbtsax/Ferrees Pliers/
Thanks John. Since you said you bought this "several years ago" I think Gordon's pair is older. So it seems they changed the design a few times. First Gordon's ones, then yours, then mine. The ones I bought are more similar to the oldest design. In original condition, the oldest the newest designs are problematic. The ones you have seem to have one issue improved significantly but some still left and other drawbacks. I will post before and after photos after I modify them, maybe even today. Thanks again.
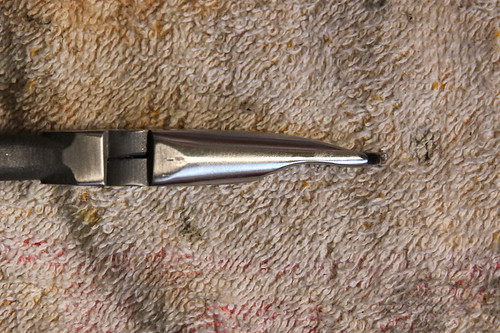
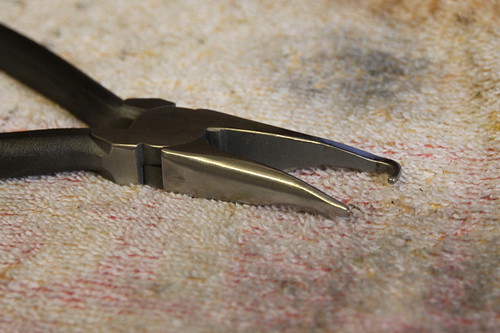
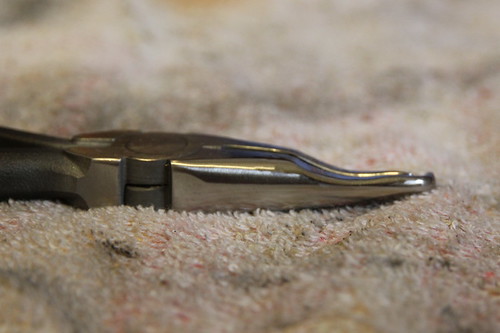
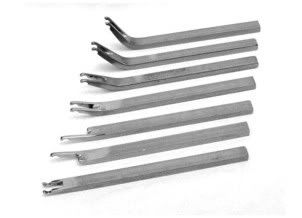
These are key adjusting pliers type D. They are made from Ferree's current version of these pliers. I prefer this version for a couple of reasons, being longer and having more "meat" on them to modify. John's older version seem to have one improvement in comparison with the current stock ones, which is the bent tip being higher (or lower, looking from the other side).
The modification is creating an S shape so the pliers fit in areas they have to fit in to be useful. As they (current version) come IMO they are not so useful and are impossible to use most of the time.
They are used mainly in two ways to align key cups front and back:
1) From the back side of keys, over hinge rods/tubes, then the tip under the key cup arm for support, pressing on the front of the key cup to lower it.
2) From the front side of the key cup, over the key cup and under the key cup arm, using them as a lever, pressing down, to lower the back of the key cup.
These pliers are most helpful for medium size keys or bigger, but can be used for some smaller keys too sometimes. Mainly for stack keys and other keys where the key arm is straight from the hinge.

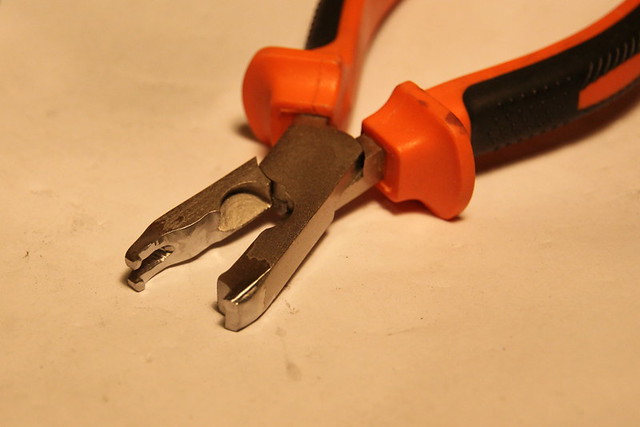
I thought it would be worth it to have a photo of key adjusting pliers type B in this thread too. Previously I only gave a link. So here they are:
The modification is creating an S shape so the pliers fit in areas they have to fit in to be useful. As they (current version) come IMO they are not so useful and are impossible to use most of the time.
They are used mainly in two ways to align key cups front and back:
1) From the back side of keys, over hinge rods/tubes, then the tip under the key cup arm for support, pressing on the front of the key cup to lower it.
2) From the front side of the key cup, over the key cup and under the key cup arm, using them as a lever, pressing down, to lower the back of the key cup.
These pliers are most helpful for medium size keys or bigger, but can be used for some smaller keys too sometimes. Mainly for stack keys and other keys where the key arm is straight from the hinge.
I thought it would be worth it to have a photo of key adjusting pliers type B in this thread too. Previously I only gave a link. So here they are:
2) From the front side of the key cup, over the key cup and under the key cup arm, using them as a lever, pressing down, to lower the back of the key cup.
Very nice plier modifications! Pardon me, but I am having trouble understanding comment #2. It seems to me that when the "L" shaped end of the pliers is under the key arm at the back of the key cup and the pliers are then used as a lever pressing down, that the front of the key is lowered---not the back. Am I missing something here?
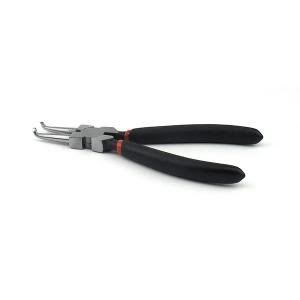
To lower the backs of keys I prefer to use the Ferree's key bending pliers pictured below. Putting some teflon tape or ultrasued in the groove of the tool helps to prevent tool marks in the "spine" of the key.
Hi John
Pliers type D are actually the easiest to modify because they are already close to the correct shape so there is less material to remove. There are also less of the very critical but small surfaces that are impossible to build back once removed, like in pliers C and especially B. I think they took about half an hour or a bit more, as opposed to at least a couple of hours for each of the others (probably more).
I will try to take a photo sometimes, maybe it will show it better. I did mean to lower the back in comment #2. I'm not sure I can explain it clearly but I can try. Hold the pliers from the front side of the key. The pliers hook under the key cup arm, then press on the back of the key cup, on either side of where the key cup arm attaches to the key cup. This lowers the back of the key cup. For this to lower the front, the pliers would have to be bigger with a much bigger S so they reach all the way to the front of the key, a bit like a "bridge" over the key cup. I hope it clarifies it a little.
For lowering the front I use them as in comment #1, or use pliers B for some key cups, or sometimes put a shim under the back of the pad and press the front.
I know these levers from Ferree's but don't like them so much personally. I much prefer these pliers and other methods. I use the Ferree's L shaped lever sometimes as shims for aligning key cups but like you also use others things for this too.
Last edited:
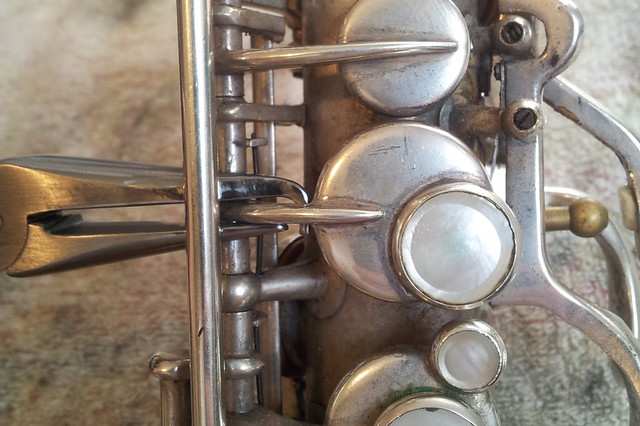
OK, here are a couple of photos showing the main two uses of these pliers.
The 1st photo shows how they are used to lower the front of key cups. After modification they fit under another key hinge. They are used as support for the key arm, leaning against the key hinge to create a lever, then pressing on the front of the key cup to lower it (usually with fingers).
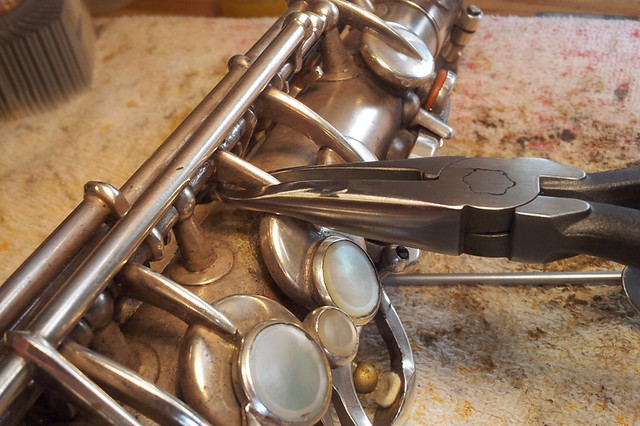
The 2nd photo shows how they are used to lower the back of key cups. They hook under the key arm from the other side and press on the handle side. The S shaped part presses against the back of the key cup to lower it (actually change the angle of the key arm).
As it comes originally, it wouldn't fit in the way it does in the 1st photo and many other keys (even without a hinge to fit under). It would also fit significantly less keys for using it as in the 2nd photo and even where it would, the angle and surface wouldn't be so good (almost perpendicular to the key cup).
I hope this helps.
The 1st photo shows how they are used to lower the front of key cups. After modification they fit under another key hinge. They are used as support for the key arm, leaning against the key hinge to create a lever, then pressing on the front of the key cup to lower it (usually with fingers).
The 2nd photo shows how they are used to lower the back of key cups. They hook under the key arm from the other side and press on the handle side. The S shaped part presses against the back of the key cup to lower it (actually change the angle of the key arm).
As it comes originally, it wouldn't fit in the way it does in the 1st photo and many other keys (even without a hinge to fit under). It would also fit significantly less keys for using it as in the 2nd photo and even where it would, the angle and surface wouldn't be so good (almost perpendicular to the key cup).
I hope this helps.
Thanks for the great photos showing how the tool is used. I still have some reservations about using the pliers this way to lower the backs of keys.
First of all I see a potential to disfigure the key cup since the pliers are pressing down on the cup itself and not the key arm. Second, it seems to me that using the hinge tube as the fulcrum (like when bending the front of the key down) would work better than using the key arm as the fulcrum as is done in this case.
In any event I will try this with my Ferree's key bending pliers to see for myself how well it works used in this manner. For lowering the backs of keys very slightly, there is always the old standby of putting a popsicle stick under the front of the key and giving the key arm at the back of the key a sharp rap with a plastic or rawhide mallet.
I will try to answer themI still have some reservations about using the pliers this way to lower the backs of keys.
")
By "disfigure" you mean distort the key cup or leaving marks on it?First of all I see a potential to disfigure the key cup since the pliers are pressing down on the cup itself and not the key arm.
Re distorting it, IME this is actually the method that is least likely to distort it. It puts the least pressure on different areas of the key cup itself. Other methods can distort it when using support under one area, for example if the key cup is relatively soft but the key arm is relatively hard (a pretty poor design).
Re leaving marks, the modified pliers are not only shaped in a certain way to fit different areas, but a lot of time is spent on shaping and polishing the surfaces that are going to touch the sax parts to prevent them leaving any marks. For example there are no rough surfaces there, sharp angles, very small contact points, etc. At worst case you can put some fabric between the key cup and pliers to be absolutely sure, but IME with them they don't leave marks if shaped exactly right.
Depending on the shape and length of the key cup arm and the pliers, for some keys you can put the tip farther away under the hinge. In the photo it's almost under the hinge. In both cases the result is lowering the back of the key cup by bending the key cup arm. You could make a pair of pliers with two hooks at the end pointing up (when cut S is down) to use for levers on the key hinge. I would do that but I found it doesn't make a difference. So I prefer to have one pliers I can use for both since it's always necessary to bend back a little after any bend, so just more convenient (though sometimes it's unecessary to use the pliers to bend back).Second, it seems to me that using the hinge tube as the fulcrum (like when bending the front of the key down) would work better than using the key arm as the fulcrum as is done in this case.
I would be interested to know how it works, since yours are a significantly difference shape. Other than the "higher" bent tip (or "lower", depending on how you look at it) allowing to fit in more areas than the current stock pair, they still seems to prevent reaching some areas... or not? I'm also wondering how the surfaces are shaped for these uses. Anyway I would like to know how they work. I guess you might or might not be able to shape them to work better.In any event I will try this with my Ferree's key bending pliers to see for myself how well it works used in this manner.
Yes, I do that sometimes, but a lot less since I started using these pliers. I always feel I prefer to use bending like this instead of tapping because it gives a lot more control for accuracy and there is less risk. Tapping is also "messy", having to hold the shim under the key while tapping all at the same time. For many keys you can barely reach so you need an "extension" e.g. a plastic or wood short rod to tap on, still all at the same time (possible but...).For lowering the backs of keys very slightly, there is always the old standby of putting a popsicle stick under the front of the key and giving the key arm at the back of the key a sharp rap with a plastic or rawhide mallet.
At least that is IMO and IME
Thanks for letting me play "devil's advocate" with you on this topic. I see a similarity with the way you use your modified pliers to the Kowalski Flute Key pliers from JL Smith shown below. These pliers work well to bend the fronts of flute key cups down.
Yes, pliers type D don't work so well for most flute keys. Gordon Palmer's type A pliers (not shown in this thread) are the equivilents of these pliers you showed by Marius Kowalski. The Kowalski pliers have a small advantage of leaning on two places on the hinge (on each side of the key) for contra, but overall I prefer Gordon's design which fits better in more places, especially with some very "crowded" flute keys.