NAPBIRT Saxophone University

Sometimes the simple method is the best.

If you were to measure tone hole openings "venting capability" value for dollar the pieces displayed above by two members would more than suffice, if you were to approach this in an engineering perspective where you needed an exact measurement which could be repeatable and digitally displayed, then this could also be achieved but would involve quite a labour intensive build to create, but do-able.
 
Sorry for the interruption. I had to remove some stuff (noted above). If anyone has any questions, feel free to PM me.

Please continue the thread. Thanks.
 
Last edited by a moderator:
...Selmer went so far as to issue a bulletin to repair folks concerning the tendencies of some players to want to have their instruments set up so that the throw-height of all of the finger touches was exactly the same - to establish a "keyboard", so to speak. As the bulletin explained, Sax's efforts with the instrument included determination of the proper tone hole size/location on the tube, but it also included tuning of each key height when considered with a particular tone hole.

As a result, there was a rather ragged appearance of the final horn, something that offended some players. Selmer's position was that it was better to look ragged and be in tune, than to look sharp but play otherwise.

Uneven key heights have never bothered me - hell, I started out playing on an Albert bass clarinet; it's hard to get more ragged than the key heights on one of them - but I have heard plenty of comments concerning this issue over the years. I point out what the Selmer bulletin said, but I still get shove back as to the accuracy.
Standard reminder: I'm not a sax tech and I don't even play one on TV, so my comments are from a playing perspective.

I've heard about the comment of setting up key heights based on the intonation of the note played, but I had been under the impression of something like, the lower the note, the higher the height. Additionally, if you think about it from a non-tech perspective, it's a little counter-intuitive because you'd think if you have to set (for instance) :TrebleClef::Space0: at one height for better intonation, you'd have to adjust that height for :TrebleClef::Line4: -- or, of course, set it at a happy medium between the two. I'd also think that you'd have to take the key heights of the surrounding tone holes into account, too, which would make it all a rather complicated affair.
 
The effectiveness of the small hole bore gauges to measure key opening is an interesting subject. Steve's point that they are inaccurate was well taken. The following illustration will show what that degree of innacuracy actually is. The drawing is a SBA alto F key drawn to a 2:1 scale.

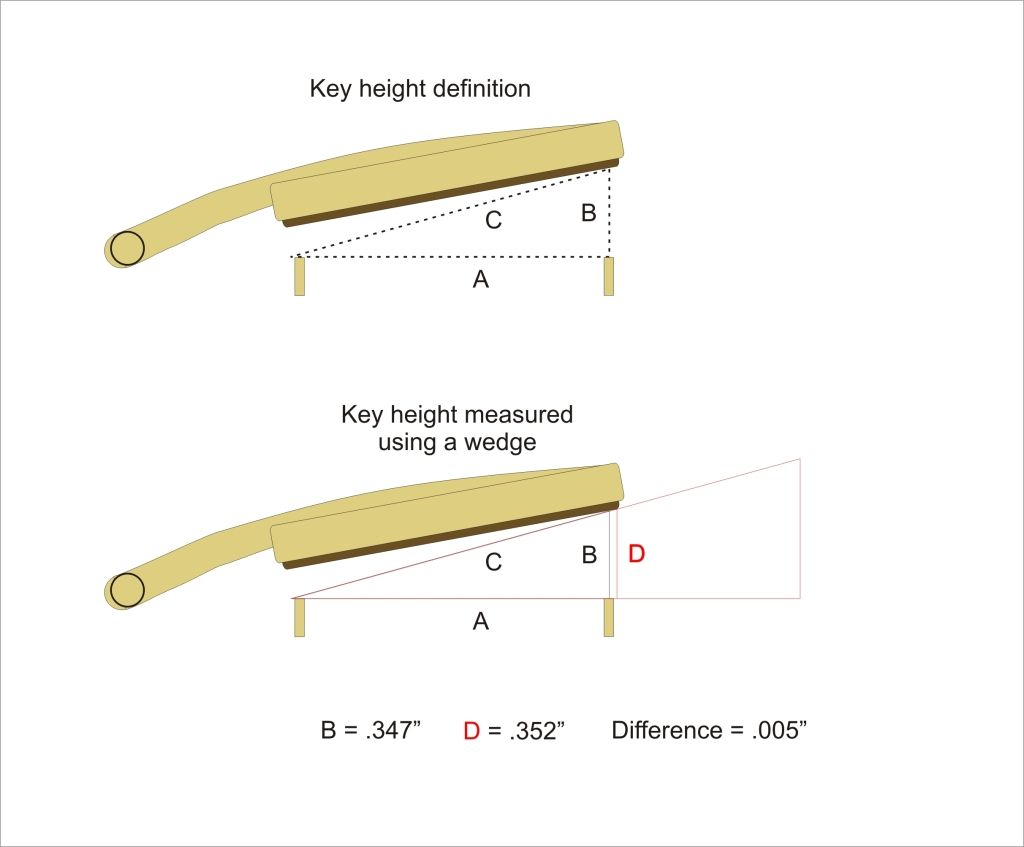
The first illustration shows my definition and concept of "key opening" or "key height" as some call it which is the length of a line perpendicular to the tone hole that extends from the top of the tone hole to the surface of the pad. This line is marked "B" in the drawing.

The second illustration shows the tool before the expansion occurs.

The last image shows the tool expanded to the point it makes contact with the pad, which by the way can be verified using a standard .001" feeler gauge. Note that, due to the fact that the key cup angle is smaller than the arc of the spherical tool, contact occurs slightly before the widest part of the hemisphere. By enlarging the illustration, the difference in those two measurements is minus .0035" which is the thickness of a sheet of copy paper.

Untitled-1.jpg


The above illustrations show the measured key height of the F key drawn to scale which is .347" + .0035" or .3505". Interestingly enough this opening is in the ball park of 30% of the tone hole diameter which would be 1.10" x .30 = .330".

This discussion seems to have raised an interest in the topic of setting saxophone key heights, which would probably best be discussed in a new thread on that particular topic.
 
Last edited:
Nice drawing.

In retrospect re-reading my post regarding the not being aware of ball gauges and general industry tooling, yes it was poorly written and did not portray my thoughts properly.

Reagrding the drawing, there are however a few alterations, the pad being inspected will not be dead flat as illustrated, the pad will be slightly puckered fom the pull of the resonator, this will prevent the ball gauge from being inserted to the optimum postion as well, when I tried the above scenario out, the innacurracy I encountered was close to 1.2mm (0.048")
 
Last edited:
1. The ball gauge is inserted in its unexpanded position as shown in the illustration.

2. Once it is centered on the rim of the tonehole, it is slowly expanded by turning the knurled end clockwise. Once it has touched the surface of the pad, you stop expanding.

3. At this point you can either try to move the ball up and down to check for lost motion meaning there is still a ways to go, or you can insert a feeler gauge between the ball and the pad to access the degree of contact.

4. If you have expanded the gauge too far you can see movement in the pad and/or key at which time you can relax the gauge and start over.

5. The gauge is then removed and the diameter is measured using a caliper.

It is no more complicated than that to get a reading accurate to within one hundredth of an inch which is more than sufficiently accurate for this purpose.

I have much better things to do than quibble over a .0035" margin of error in measuring key heights.
 
Last edited:
Nice drawing.

There are however a few alterations, the pad being inspected will not be dead flat as illustrated, the pad will be slightly puckered fom the pull of the resonator, this will prevent the ball gauge from being inserted to the optimum postion as well, when I tried the above scenario out, the innacurracy I encountered was close to 1.2mm (0.048")

These arguments apply equally to any other method of measuring key heights. Stepped guages also suffer from inaccuracies due to how far they're inserted, angle of insertion and so on, but rightly have many fans.

John's method will work accurately for any circumstances where he''s measured before repadding and more than accurately enough for a situation where manufacturers settings are available. If Yamaha see fit to use and teach it, then it's more han good enough for me.

One observation as an example - I recently had a flat C# caused by the key not opening enough. I measured, compared to other keys. And a couple of other saxes. Then set to work to lift the key. Real problem was the pad wasn't seated properly. Heated, adjusted, measured, still no good. Traced to too much shellac. Pad out, shellac reduced, pad back in, checked measurements. Now I got the increase I needed.

Point is for this job what's needed is something that's easy to use, consistent and precise - but not necessarily accurate. This can fit the bill. So can stepped guauges/wedges. So can steel rods/drill shafts.

Frankly I don't see what you're trying to prove here.
 
Kev, Im not trying to prove anything.

Firstly I dont measure key height openings. John saids he does, which is fine for him.

One of the reasons stated for measuring key heights was to be able to set it up in accordance with Yamahas written specs, and the comment was exactly as per there specs.

Unfortunatley this method does not give you an exact key height opening at the point parrallel to the tone hole. Thats the point of the photos, it does give you a measurement which can be made and is repeatable but not the width in question here. That was my point. The difference is not 0.0035" but is in fact closer to 0.048" which is far greater, 0.048" is a huge amount and is the difference between a note playing well and a note being stuffy, 0.0035 is negligigble and a player would not hear the difference.

To this end reference Yamaha, yamaha do not teach this, this was accordingly taught by someone who has just started working for yamaha, I know this for a fact as I am a certified Yamaha Repairer.

I agree with drill rods I agree with wedges I agree with the ball gauge as good guides to give an approximation of a key height opening.

Now my question for you kev, having read the posts you have posted on this topic, is your question unbiased, have you actually tried this ball gauge out in this scenario. Or are you continung the topic for other gains.
 
I think many training classes are for those that may not know specifics of a particular technique.

After all, at one point we all first learned about keywork height. How did we learn?

This Yamaha taught technique is one using specific tools. Why the ball gauge technique?
Maybe to allow the technician time to inspect and more visually and physically 'see' the height.

Sure they could have used too much pressure to push it into the pad.

And lets not forget that if one uses a bit too much finger pressure on a caliper that they will get an incorrect measurement reading. There are many mistakes on can make in measuring that can skew the final measurement.

But it is used as a "guide" to understanding and measuring.

We could have used a "T" gauge but it's spring loaded. But it still would function and be approximately close. We could also use the stepped gauges that I use which is very quick.

Over time we get used to this technique and have the background knowledge of how we learned.

I think when Gary Ferree taught me (and others) this eons ago he used the stepped gauge and his finger as a tool to teach us. How many times did I put the gauge against the opening to pull it away and forget what step it was on and second guess myself? I can see the advantage of using a gauge as it's fixed and you don't forget as you measure it as many times as you want, then reinspect to learn, etc

But normally I think Gary just eyed it during the build and then listened to how it sounded.

So I just look at this as one way to learn and measure about keywork height. There's more to it than a key is XX.XXmm open as predefined by the manufacturer. But the way it sounds too to the player and tech.
 
On another topic, when I first started measuring clarinet bores including the toneholes I would use ball gauges.

But I soon found out for the finger/key toneholes that I could just use the caliper itself. On a Buffet where the toneholes are hourglass shaped using the ball gauge actually was kinda ineffective, at least time-wise.

With the caliper one just has to not use too much pressure (the caliper is very sensitive and you can over measure if you use too much finger pressure to open it).

Not to mention of the time saved from using one tool versus 2.

I just figured out while writing this how to measure the tonehole undercut. I measure the overcut and center of the tonehole for comparison purposes between years and makes and models.
 
Steve, we experimented in manufacturing clarinet bodys barrels and bells from local woods here in australia, jarrah / meranti / sheoak are what we have made so far and recently commercially released our first hand made clarinet made from jarrah.

I found with the deconstruction of others (cut them in half and laser scanned them into a 3d model) yes I have a laser scanner, that the internal bore sizes were so "different" between models and makes and even between like models.

You cannot measure more accuratley than a laser scanner 3d modelled and then use a computer to generate the distances, we trialled bore gauges, verniers, inside calipers etc, the best measurement and the most accurate and repeatable method we found against the laser scanned image was a coned cylindrical wedge with a cross slide, you insert the cone into the hole the slide rides up through the centre and marks the end of the insertion point, "Go figure", a wedge is so simple and easy to make, we look for more complicated methhods and realistically they are un-neccassary
 
wow, my methods are quite primitive compared to that .. but cost alot less.

My drive has been to learn the evolution of the clarinet design (mostly Buffet) from early models to later models. And specifically the specific design characteristics that people don't know and the manufacturer won't tell about.

Unless of course you laser 3D it.

I was in automotive for a time but this was when measurements were manual and the ball gauge automated arm first came about, maybe 15+ years ago? But a friend of mine was a "analyst" that did these measurements by hand ... these initial devices basically eliminated that profession as it sped up the process considerably. Then the lasers came out.

I would love to read more about the jarrah wood clarinet.
Got any free samples ?
 
The ball gauge, I think your referring to a faro arm, thats what we started out with, you use the arm to touch an item, click and create a point on your computer, with a wire mesh slowly generated from each individual click.

A while back we went laser, it generates 2 million dots an hr on a point cloud system, certainly speeds up the process.

What type of free samples are you after.
 

Attachments

  • cnc laser scanner.jpg
    cnc laser scanner.jpg
    149.2 KB · Views: 315
  • cnc laser scanner.jpg
    cnc laser scanner.jpg
    149.2 KB · Views: 308
That's it, a Faro arm. It really changed the industry.

I was joking about the samples - and being the normal curious (and cheap) musician/tech .. barrels, bells, an entire clarinet. lol

Have you done the same inspection of saxophones. I've always been curious on the various tonehole sizes (evolution/deevolution) of Selmer saxes, JK, Buffet, etc. I've also been toying with the idea of a thread on how the diameter of toneholes affect the tonal/playability of a sax. But I don't have any real info on it for any real conclusions.
 
I have laser scanned saxes, but not drawn any correlation with them, as we never had any intention to build one.

Have applied very litte time and effort into that avenue. Same with flutes / guitars / oboes etc, we have full 3d models created of each, brand names and non brand names, but we have only pursued the clarinet path as it was the easiest "short term goal"
 
Not to belabour the point, but I have been studying ways to accurately measure key heights for several years. I have been down the road of step gauges and wedges. I found that step gauges give good approximate measurements. For my purposes "wedges" were found to be unsatisfactory for the following reasons.

1. Wedges require straight access to the widest opening of the key to measure accurately. Many keys do not allow this straight access.

2. As shown in the illustration below, a wedge contacts the outermost portion of the pad before the location perpendicular to the tone hole directly above the tonehole rim. This results in a larger measurement than one taken directly above the tonehole rim.

3. In order to be accurate, the wedge must be kept perfectly flat and parallel with the surface of the tonehole.

4. When making the angle of the wedge small enough to reach the inside rim of the tonehole to insure that it is flat oftentimes it can't be pushed in far enough to make contact with the pad due to obstructions in back of the key.

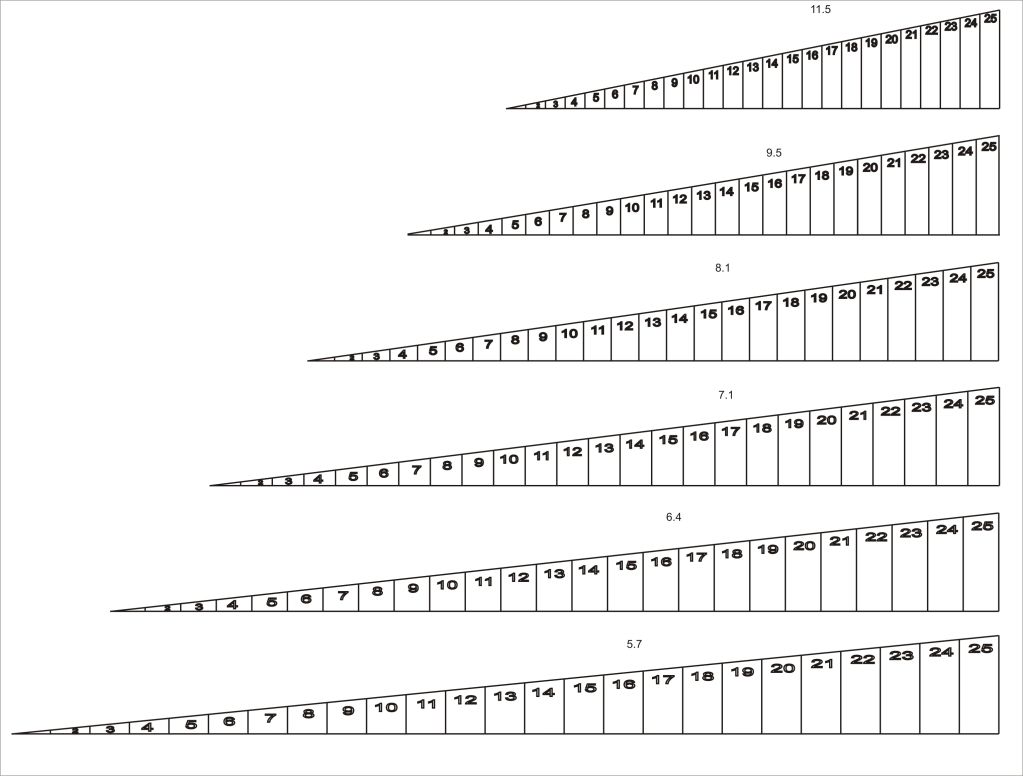
5. It is impractical to try to measure fractions of millimeters using a wedge tool like the ones shown below. They work best at "rounding" figures.

This is why I was excited to hear about the small bore gauge. It can be inserted from many different angles to measure hard to reach keys. Being (mostly) spherical it does not need to be perfectly parallel/perpendicualr with the tonehole to take accurate measurements. They go from about 3mm to 13mm opening to work for all alto and tenor sax keys. (I don't have a bari at the present time to measure the opening of the low A and Bb).

The illustration below shows the the pad height measured using a wedge. The second shows the set of wedge gauges in millimeters that were created to test this idea. I have also attached the pdf file if anyone wants to print them out to cut out and glue to a cardboard backing to try for themselves.

Measuringkeyheightusingwedge.jpg

Wedgeshapedkeyopeningtool.jpg
 

Attachments

  • Wedge shaped key opening tool.pdf
    63.2 KB · Views: 358
  • Wedge shaped key opening tool.pdf
    63.2 KB · Views: 316
Agreed, step wedges make good aproximate measurements, by your displayed process, 0.005" is pretty good for 30cents worth of cardboard to make the tool out of

It is also hard to impossible to gauge how inaccurate a process will be by drawings, an example is, you show the fulcrum point of the arm parallel with the top of the tone hole, many instances the fulcrum point is distinctively above and distinctively below.

All process's are approximations and I think all process's have a relatively high degree of inaccuracy. But all IMO.

If doing this makes you a better repairer then thats all that matters
 
I was joking about the samples - and being the normal curious (and cheap) musician/tech .. barrels, bells, an entire clarinet. lol
WF Admin gets samples before WF CE does, Steve :p.
 
It is also hard to impossible to gauge how inaccurate a process will be by drawings, an example is, you show the fulcrum point of the arm parallel with the top of the tone hole, many instances the fulcrum point is distinctively above and distinctively below.
Question and comment:
Can you tell me what you're referring to with this? I can think of a couple of keys on a sax that aren't hinged like the diagram shows, like the chromatic F#, altissimo D, Eb and F, and, on some horns, the side chromatic Bb key, but it's only those. I think. My mind wander ... ooh. Shiny!
 
Oh. I remember the other thing I wanted to mention.

The actual height is always going to be slightly different from the actual height because of the calculation used and the fact that it's not a perfectly flat plane (i.e. not a real right triangle) you're measuring, but something a bit convex. To get closer, I think you'd have to use calculus, not algebra, and the thing is that, while you'd get a more accurate number, it's probably not going to make that much of difference -- definitely less than 0.0035", the number you mentioned earlier.

EDIT: oh. I think I just said exactly JBT's comment in a mathematical way. Which, on some level, is pretty kewl.

I've also played with -- well, before they stopped me -- one of those laser measuring things. In this case, its primary purpose was to measure copper cones for RPGs. Grenades, too, I think. Loong while ago.
 
Back
Top Bottom