Reeds are a personal choice. But a little bit of input in that softer reeds are normally thinner sounding and can be buzzy especially after it soaks up moisture. But, keep in mind, amateurs may be learning and start with a soft reed. There is nothing wrong with that scenario as some mouthpieces are designed to correct certain problems.
But as one matures one may realize that a softer reed, though easier to play, sounds thin, can get buzzy and ones’ intonation may be flat especially in the upper register. Read this (half way down the linked page) for more information.
Reed quality does vary. Two areas to look at for reeds:
-
Take a look at your reeds with a bright light behind them. Notice the thickness of the veins and compare that to other brand reeds. Also notice the lighter and darker shaded parts and compare that to other strengths and brands of reeds. Compare this to reeds that you like.
-
Compare the butt ends of the reeds. You may notice three variations: symetical cut but may vary in height, offset to the left with the left side thinner than the right side and offset to the right with the right side thinner than the left side.
Concave Mouthpiece Tables
For those that read about a concave mouthpiece table, one must be accutely aware that dependent upon the ligature design, if one tightens a ligature too much the ligature will bend the reed into the concave area. This will also bend the tip of the reed further away from where it should be from the tip and facing and you will have issues with playing.
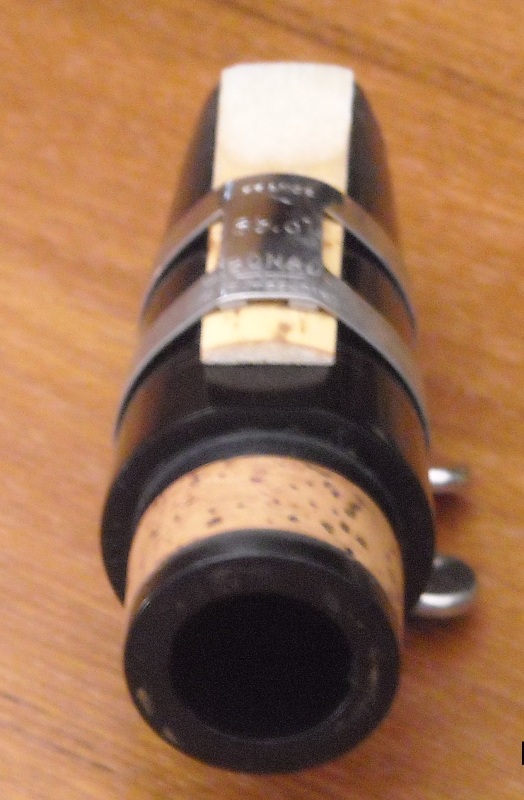
Ligatures and Tonal Variance
I am a believer that ligatures can make a difference in ones’ tone. Not necessarily major differences but at least minor differences (including the screw tightness as it can affect how the reed ultimately responds – always make sure screws are lubricated). But lets look at the basic concept.
Old ligatures were simply a round loop with screws on it. This round loop pushed at the side edges of the reed moreso than pushing the reed up against the mouthpiece. Later on those loops had indentations for the reed location, and then they evolved into the hundreds of options that we see today.
Several years ago I was playing for a retired pro clarinet player. He loved my playing (playing from his big band books) though he said that my tone had a high pitch squeal to it. This high pitch squeal was not audible to myself until I really listened to the tonal quality then it was quite prevalent.
We had about 8 clarinets there, numerous mouthpieces and numerous reeds. I went through all of them trying to determine how that high pitch squeal was there but to no avail. Then I recalled that I had used the same ligature on all the tests of various reed, mouthpiece, and clarinet changes. I switched ligatures to a metal band with a floating cradle to better support the reed. The squeal was GONE.
After that I really worked on improving my ability of hearing variances in tonal qualities based on the ligature and everything else. To my amazement I certainly could hear variances among ligatures.
To quote Jack Brymer from his book “Clarinet”, 1977, pg 70 “If one produces a deep, rich note on any musical instrument, and listens to it with care over a fairly long period, other higher notes soon begin to make themselves audible in the sound, and to emerge into the consciousness, most of the pleasantly related to harmonically but a few of them slightly dissonant.”
That quote rang true in my learnings with the above ligature example.
In short, metal ligatures that are based on a loop and fully cradled the reed (I only tested a few) tended to have slightly higher harmonics to them than the non-metal ligatures. But most of the fabric/rubber ones that fully cradled the reed tended to slightly darken the harmonics by comparison.
My favorite is a BG revelation ligature which is fabric with a metal insert to push the reed up to the mouthpiece in a cradle. The sides of the ligature do not touch the reed. My other favorites are: Vandoren Klassik (a 100% string ligature, Vandoren Masters (metal), Vandoren Optima with the horizontal ridges (note: the 4 pinned plate must not be over tightened otherwise the pins dig into the reed and create a full platform); Rovner dark (though this tends to deaden the tone a bit as it cradles the entire width of the reed).
Players should not worry about ligatures until they mature to a certain level. Reeds vary greatly too and one should listen to their teacher for direction here until they are mature enough to move forward with their own experiments.
In Summary
-
Only more mature players may audibly hear the minute differences.
-
The ligature design of how it cradles the reeds affects the tonal quality
-
The tightness of the screws affects the response and tonal quality
-
Always lubricate the screw(s) – this eases it’s installation
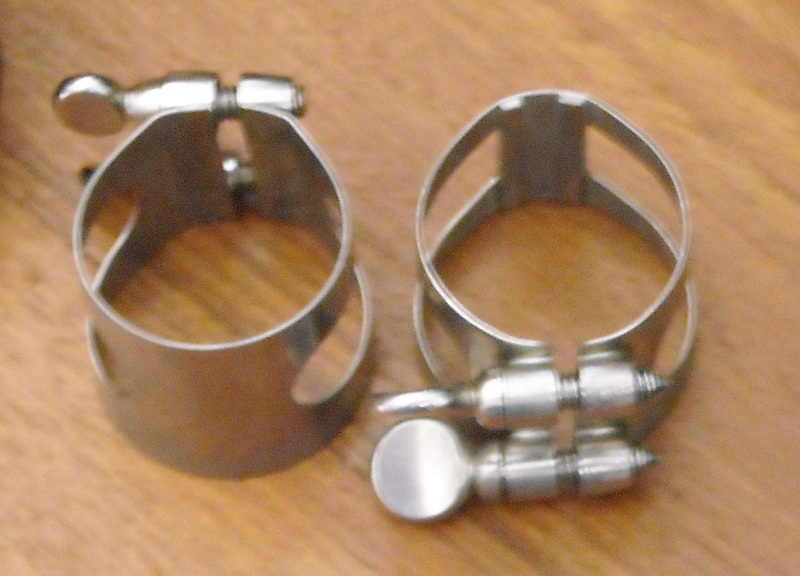 |
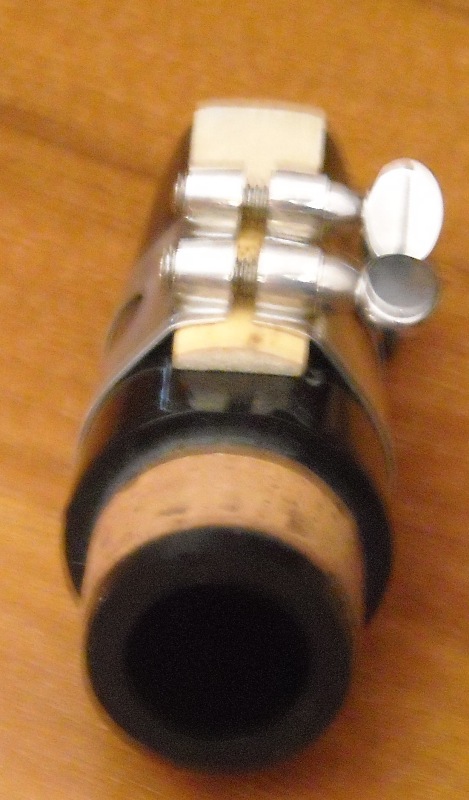
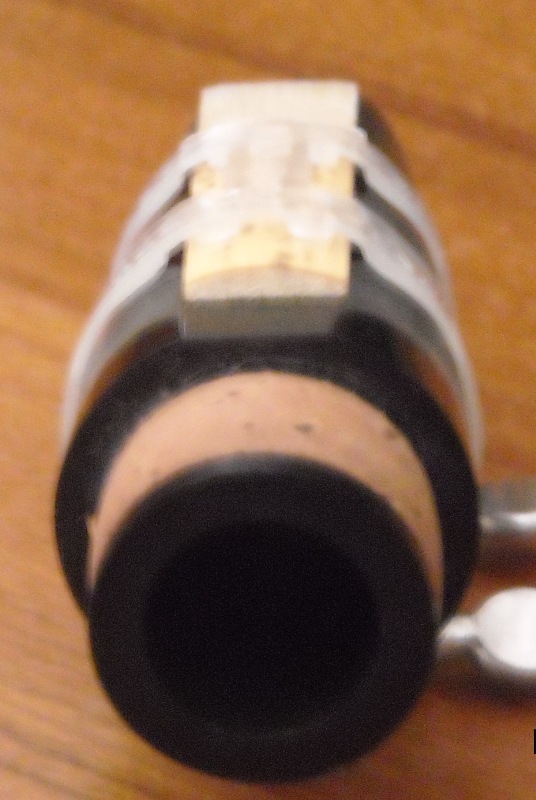
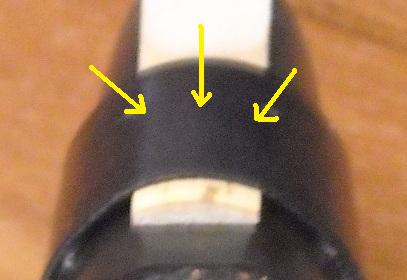
NOTE: double click on each picture for a larger view LEFT: a 1974 Noblet ligature. Even though it has a small cradle the pressure points are not up on the reed. RIGHT: a 1972 Bonade inverted ligature. It has two metal ridges that rise up from the bottom to put upwards pressure on a reed. |
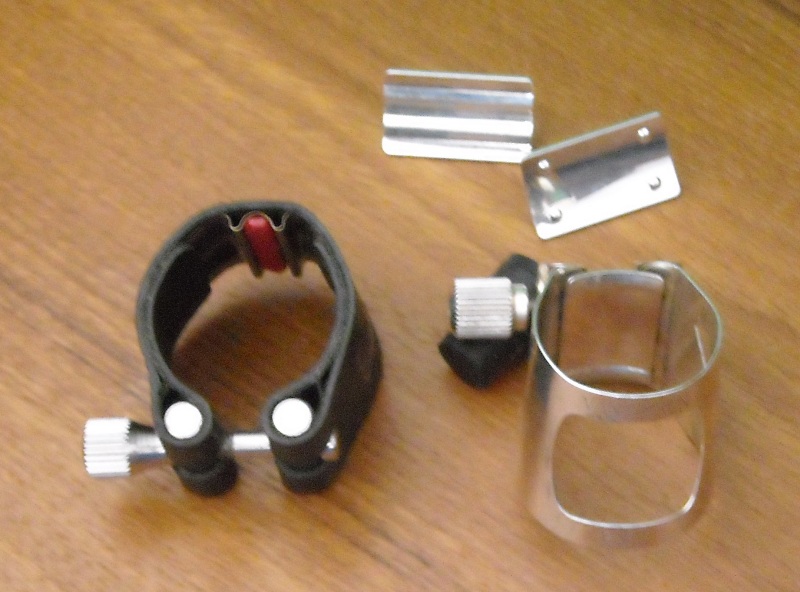 |
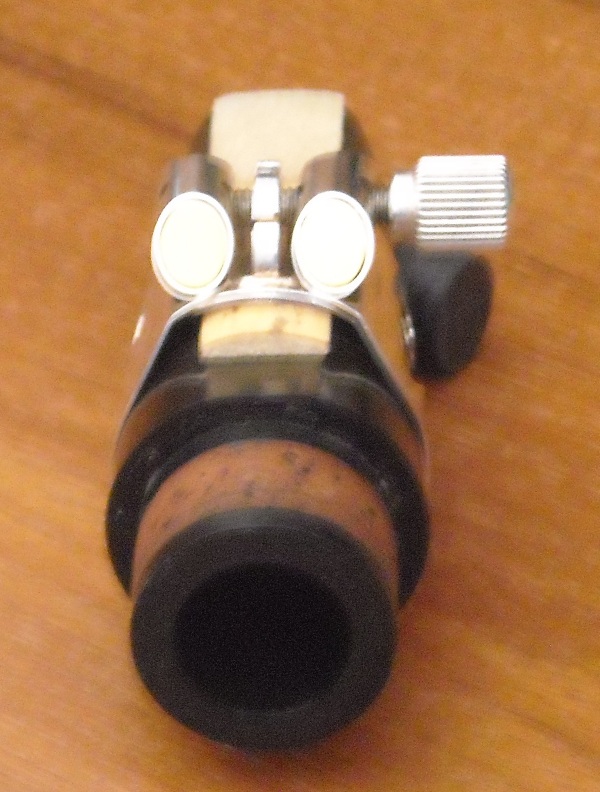
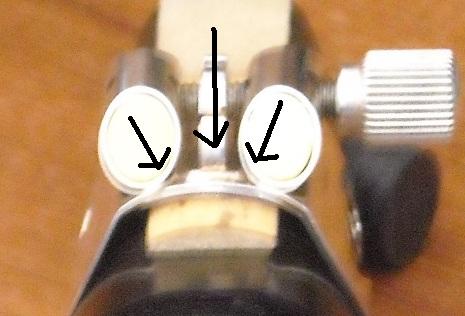
LEFT: BG revelation ligature which when the single screw, and metal ridges in the base cradle. As tightened it provides upward pressure of the reed to the mpc. RIGHT: Vandoren Optimum which provides upward pressure to the reed. The plate in the lig has 2 horizontal ridges. Behind to the left are vertical ridges, and a 4 pin. The 4 pin provides an idea of how lightly a ligature should be put on – or how not so tight. IF put on tightly the 4 pins will embed into the reed. |
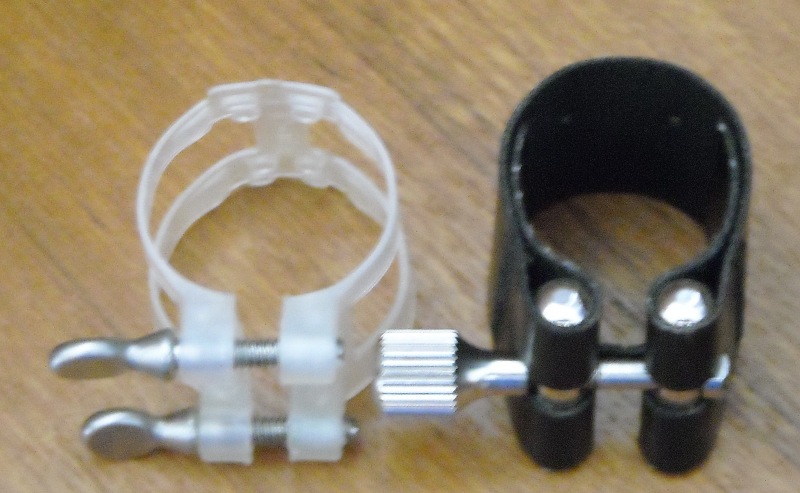 |
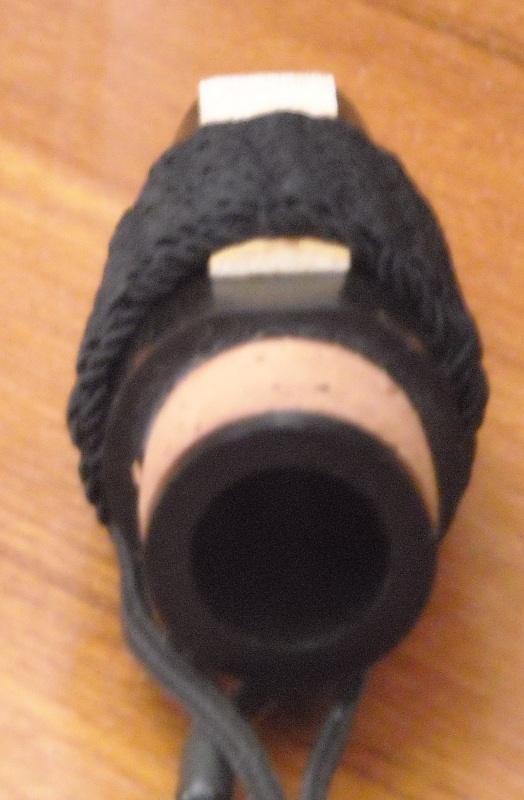
LEFT: Luyben inverted plastic ligature RIGHT: Rovner style ligature. This provides pressure across the entire back of the reed. |
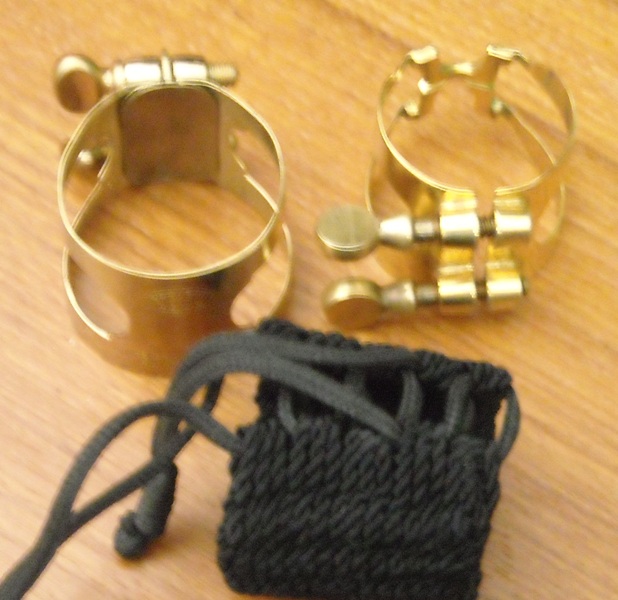 |
LEFT: early Penzel-Muller which has a floating reed platform, similar to idea Vandoren Optimum now uses RIGHT: 1980s Harrison which uses specific pressure points, and inverted, to lift the reed to the mpc BOTTOM: Vandoren Klassik which is all string which provides an even support for the reed |
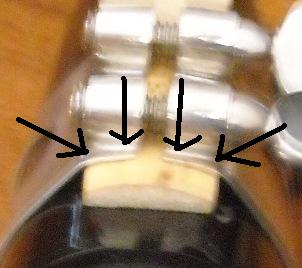
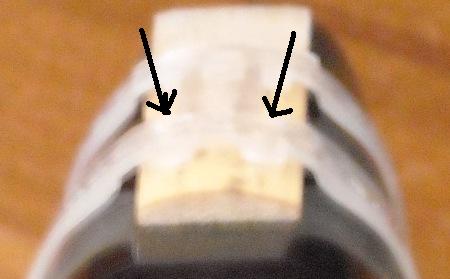
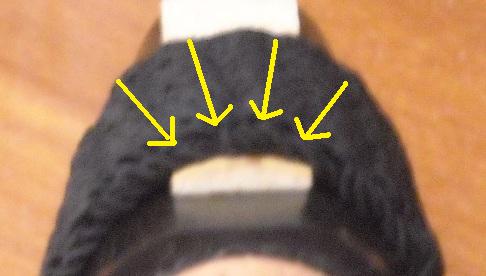
Ligature Pressure Points (Reed support)
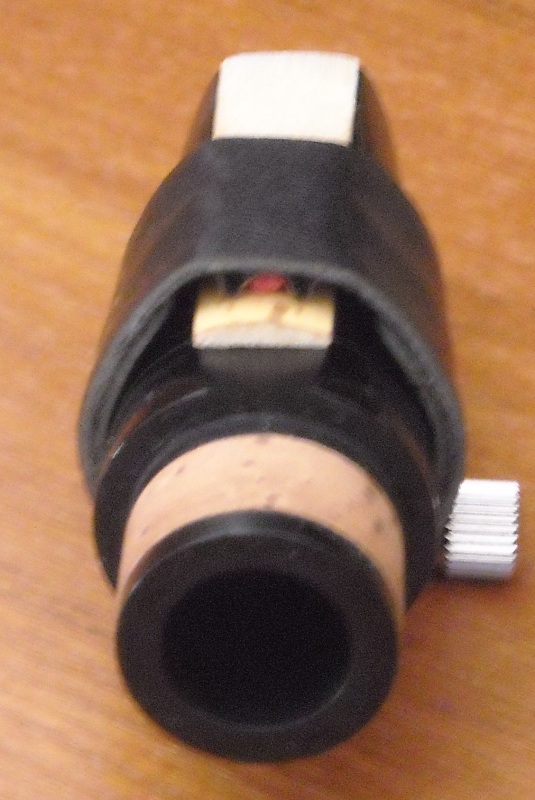
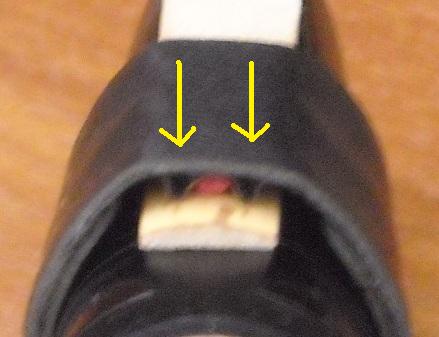
Pictures with arrows shows the pressure points from the ligature to the reed. A reed shaped piece of foam with square lines on the back end was used to identify which parts of the reed got compression from which direction then noted. Pictures below show a cane reed installed.
 |
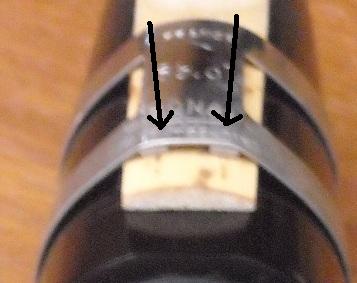
GENERICThe generic ligature, when you tighten the double screw puts pressure mostly sideways on the reed in addition to towards the mouthpiece. True, round loops pinches the reed from the sides. Not the optimum designs.
|
 |
ROVER STYLE The Rovner style mouthpiece, due to it’s flexibility, never pinches the reed but puts pressure across the entire width of the reed downwards onto the mouthpiece.
|
 |
VANDOREN OPTIMUMThe Vandoren Optimum was designed to push the reed from the top down onto the mouthpiece. The various plates cradle the reed in various methods.
|
 |
BGThe BG revelation ligature has metal cradles which, when the ligature is tightened, push the reed toward the mouthpiece.
|
 |
BONADEThe inverted Bonade ligature, when tightened, pushed the reed towards the mouthpiece. One important factor about inverted metal ligatures is that if they are over tightened on can change the form of the metal where it could then cause the metal sides to press up against the reed. This is “blow out” of the ligature itself. Ligatures can be repaired from this but care has to be taken from that point on as metals are not designed to be reshaped and tend to break after several reshapings.
|
 |
LUYBENThe Luyben ligature has 4 round pins which put pressure on the reed to take it to the mouthpiece. This plastic ligature can be over tightened and the plastic stretched. They are cheap and can be replaced quite inexpensively. But they seem to stretch and never allow a super tight fit and the screws are hard to screw into the plastic threads.
|
 |
VANDOREN KLASSIKVandoren created this ligature as the “shoe string” ligature, or wrap ligature from early clarinets. This cradles the reed without over tightening.
|
The mouthpiece is the first major variable one comes across when selecting an instrument. Sometimes you buy a clarinet and you play what is in the case. But as one progresses they start searching for a different sound, or a teacher recommends a particular brand and model of mouthpiece.
What exactly is the difference between mouthpieces. Click here are some numbers just to peruse
But what do all those numbers mean and how do they relate to how a mouthpiece actually plays ?
Let us first take a look at two factors that one should be able to see without measuring tools.
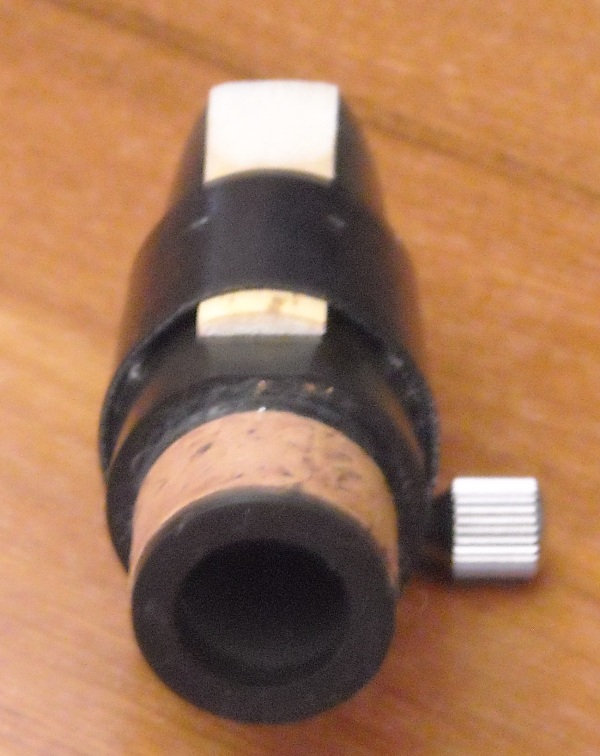
| First, look down the bore/back end of the mouthpiece. What you will notice is that the throat may be in various designs from an “H” or parallel sidewalls to an “A” or angled sidewall. The “H” design may vary by the width too. The smaller width constricting air flow even more, and the larger A providing ease of more airflow.
Generally speaking, the H frame will give a more centered and controlled sound; whereas the A frame will give a more spread sound. |
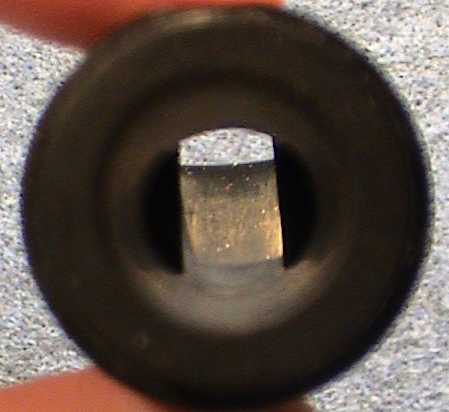 “H” Frame |
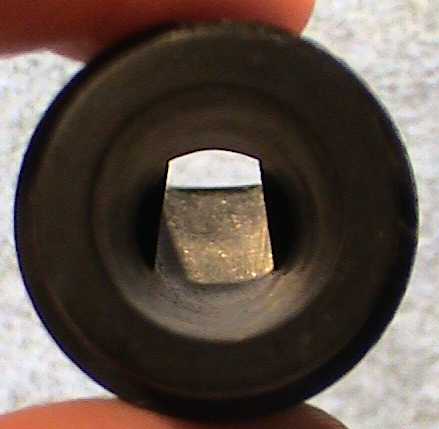 “A” Frame |
Second, take a close look at the tip of the mouthpiece. At the very tip it is flat but right after that ![]() it starts going down to the throat of the mouthpiece. Some mouthpieces have what is called a “roll over” baffle. The baffle, for this explanation is the part right behind the tip. At first this is hard to see until you have a mouthpiece with a roll-over baffle and one without. But, in general the mouthpiece with the roll-over baffle will provide a faster response and brighter tone than the one without a roll-over baffle. The non-baffle mouthpiece may sound more dull sounding (or darker depending upon design) and less focused.
it starts going down to the throat of the mouthpiece. Some mouthpieces have what is called a “roll over” baffle. The baffle, for this explanation is the part right behind the tip. At first this is hard to see until you have a mouthpiece with a roll-over baffle and one without. But, in general the mouthpiece with the roll-over baffle will provide a faster response and brighter tone than the one without a roll-over baffle. The non-baffle mouthpiece may sound more dull sounding (or darker depending upon design) and less focused.
Just below the tip the design of the baffle down to the throat are very important in the intonation and tonal quality of the instrument (assuming the mouthpiece is well matched to the instrument).
If one were to take many completely 100% perfect copies of each other and experiment one would learn that as one modifies the baffle going down one would get a tuning modification going down the instrument. The mathematical model of this is too complex to review in this summary but if broken down into three quadrants the upper quadrant would affect the intonation of all left hand notes and the high register sound production. The 2nd quadrant is related to the intonation of the lower and left hand low register. The third quadrant is directly related to the intonation of the low register.
The mouthpiece bore itself can have effects on the throat tones – a smaller diameter and the sharper the throat tones; a larger diameter and the flatter. But it also regulates the fullness of the higher register. Experimenting with mouthpieces really made me feel like making mouthpieces, but the complexity and fine-tuning really is for a more a professional clarinet player to design, blueprint and play test. There are many more aspects of the mouthpiece which affect the way it plays.
Overall, all the aspects of the mouthpiece make a difference in the way it sounds to the ears, and responds to the player. The baffle from tip to throat, the shape of the throat, tip opening, type and length of rail curve, thickness of rails, shape of window box going down to baffle, shape (cylindrical or conical) of bore in addition to the type of material.
But the reed which is attached to the mouthpiece is the generator. The reed which is stimulated and vibrates creates a synchronous sine wave (a single fundamental with no harmonics also known as a pure sound), unsynchronous saw-tooth type (contains all types of harmonics also known as a rich sound); and a square wave which only contains odd-number harmonics (more on this later).
This basic idea of the “generator” is quite simple. This is air-dynamics, or simply put the air that the player blows into the instrument using the reed that vibrates and thus excites the air column inside the clarinet. A player’s air column, a nice steady stream which as we know produces a nice constant tone, is deflected over the surface of the reed and pushes it shut. The reed itself, due to it’s strength like a diving board, returns to the open position until the air stream pushes it shut again. This is the process that creates the waves of air into the clarinet.
The strength of the reed helps determine that major type of waves that are created. A full ranges of harmonics and overtones is possible when it opens and shuts very rapidly. When acting more slowly the harmonics are much more limited. The player uses a damper, their lower lip to increase or decrease the spring tension of the reed to generate the various sound one is after.
Faster reed vibrating cycles generate brighter sounds, and conversely slower cycles generate more mellow sounds. This is the basis of tone production and tone variation and thus the method the air-stream is influenced upon the reed becomes important. The shape of the reed is also important, such as the difference between a Vandoren and Mitchell Laurie.
But let’s get back to the mouthpiece. Now that the reed is generating harmonics these harmonics are being sent 90 degrees from a straight reed. Basically into ones lower mouth and into the mouthpiece. The roof of the mouthpiece, the slanted part opposite the reed reflects these harmonic waves which bounce back further along the reed, and back to the mouthpiece until it has a good angle and bounces down the bore of the mouthpiece and further along.
This is where the inner design of the mouthpiece helps define and shape these harmonics. Thus any slight variation can affect the way a mouthpiece shapes the tone.
Coincidentally, the air pressure from the player, countered by the back-pressure from the instrument tends to lift the reed away from the mouthpiece. Thus the role of the ligature. A ligature made from a flexible material, such as the Vandoren Klassik, will allow the reed slightly more flexibility, thus a longer reed, thus slower vibrations, thus more mellow sounds. One that clamps more allows less reed flexibility, thus a shorter reed, thus faster vibrations, thus brighter sounds. Of course, this is a very small impact. Very few will be able to audibly hear the differences.
For those of you really interested in a blueprinted mouthpiece, here is a rejected Boosey & Hawkes mouthpiece design. This shows the complexity of how a manufacturer designs a mouthpiece.
As has been stated many times on many BBoards/Forums, the further up the instrument you go the more important it is for sound production, which starts first with the Player.