Embouchure
How does one teach the appropriate Clarinet embouchure ?
There are varying methods out there and I’m sure much better descriptive than
mine. I was taught many years ago back when I was about 14 years old by a
professional player (thanks to my Band Director for getting me free lessons).
I haven’t changed much since other than to vary the amount of mouthpiece that
I used based on the mouthpiece design and other items that I believe improved
my ability.
The entire objective we are striving for is to be able to play pianissimo
staccatos, high notes and low notes all with appropriate ease.
But first, let’s look at what all impacts the Embouchure and cover each area
appropriately.
Your Right hand thumb
Say What?
Yes, your right hand thumb is an important part to your embouchure.
How So ?
Think about it this way, if you were to not use your right hand thumb on the
thumb rest then it would be up to your lower lip, for the most part, to keep
the instrument up in your mouth. We want to eliminate the fact that your lower
lip has to push the mouthpiece up to your top teeth (this is biting). With
this we use your right thumb and the thumbrest to push the mouthpiece firmly
to your top teeth. No matter which embouchure you use your right thumb is
critical in assisting yourself in a good embouchure.
I?ve also found that a neckstrap can do wonders here to relieve any pain in
your right thumb. I use a simple Hyman strap with a 1 inch thick rubber O-ring
around the hook, then around the thumbrest closest to the body. This allows
quick instrument changes and even quick clarinet changes.
Mouthpiece patches also help keep your teeth in one position on the
mouthpiece. Try one, you may like them. They come in thin, medium and thick
varieties.
Embouchure Attributes
So let’s move on to more of the embouchure itself.
The key objectives are:
[1] The corners of the embouchure are pulled back ? similar to a smile
[2] The center of your embouchure is firm to support the reed. Keep in mind,
we do not want any pinching or biting (check your right thumb !)
And
[3] A good air stream supported by your diaphragm.
To do this we look at:
Your Lips and Jaw
First, your jaw should never be used to clamp up the mouthpiece up your top
teeth ? use your right thumb for that.
Your lower lip should just lightly cover your teeth. Now I happen to have
larger lips and I roll my lip completely over my teeth. But a ?proper?
embouchure has your lip slightly over the teeth. And to accommodate this is
where your tense your chin area. This is the ?pointed chin? many players hear
about.
Your chin muscles need to be tensed up and flat against your chin. This all
helps in your lower lip and helps control the reed.
Upper Teeth
The most important aspect of this is that the upper teeth should never bite
down. This will put undue stress on your lower lip embouchure and actually
push the clarinet down a bit pushing against your thumb. Your thumb should
push the clarinet up to your upper teeth.
A toothpatch actually really helps in this area. They come in thin, medium and
thick thicknesses. The toothpatch also allows your teeth not to slide around
as it possibly could without one.
Tongue
This argument seems to vary between players and teachers. All I can say is
vary your tongue position while playing long tones (or just blowing air out of
your mouth) and find out for yourself if it helps your tone.
The tongue position should be fairly high and back in your oral cavity.
Practice moving your tongue around while just blowing air (no clarinet
needed). You will want the tongue up against your teeth then pull it slowly
back until the sides of your tongue touch both the insides of your back teeth.
Notice how the sound of the air coming out of your mouth changes.
The high and back tongue position apparently helps in a hollow tone (famed my
R-13 players) but enough tonal projection to carry in a large auditorium.
Mouthpiece, Reed and Embochure
Not all mouthpieces are created equal.
They can vary by tip opening, facing length (the length of the curve in which
the reed vibrates), material, tip and side rail thickness .. you name it.
With Mouthpieces I try to show that as the facing length changes so too should
the position of your lower lip. Use a playing card or piece of paper to help
determine where you lower lip should go.
As to how it affects the tone. Start out by using as little mouthpiece as
possible. Listen carefully to the tone. Then add more mouthpiece, and more and
compare the tone of each location. Mouthpieces were design with certain
attributes and we need to play the mouthpiece in the way it was designed. Of
course, we may not like that, so we have the option of change mouthpieces. But
we should always play the mouthpiece with the correct embouchure location.
The lower lip allows control over the reed and allows up to shape the tone.
But the lower lip should never clamp the reed. Proper control will allow the
reed to vibrate over the full mouthpiece facing curve. With the proper
mouthpiece lower embouchure location you basically are allowing the reed to be
free to vibrate at the optimal compromise of the embouchure firmness. Of
course, reeds vary in cut too so reeds do have an impact.
Other Information
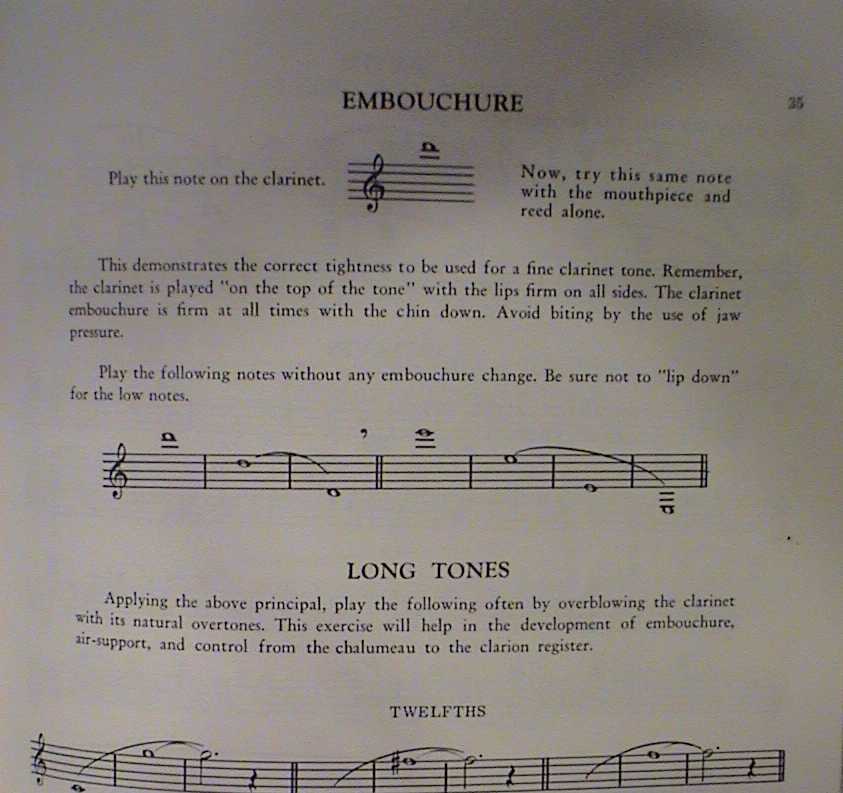
In some old technique books they teach that with the perfect embouchure you
should be able to play just your mouthpiece and get an altissimo D.
Hot vs Cold Air
Some teachers mention Hot vs Cold Air. Personally, I never understood
this until I started experimenting
Many players also double on saxophone. The Clarinet and Saxophone
embouchure should be considered completely different and the techniques are
different also.
One area that is talked about is the use of Cold Air versus Hot Air.
Some consider this a bunch of “Hot Air” but the description has some merit.
First, place your hand in front of your mouth, fairly close so that your
fingers are touching your nose and you can blow into the palm of your hand.
Now open your mouth as if you are going to yawn and blow air. The air
feels hot. Now while blowing slowly close you mouth so that the opening is
about the size for a clarinet mouthpiece to fit into, or as if you are going to
play flute. You will notice that the air is now cool. You can
experiment with different flow rates of air but this test seems to hold true for
no matter how fast or slow you blow air. This is what is defined as
Hot versus Cold air.
Now you are able to blow hot air with a small mouth opening. The key,
is in your throat. Feel your throat when you yawn and you will notice that it is
fairly “open”. Now practice keeping your throat “open” with a small mouth
opening. You will find that the air is still Hot. As you close your
throat the air becomes cold whether a small or large mouth opening. It may take
some practice to experiment with this but I hope you come to the same
conclusions.. But why ?
I’m by no means an expert at this but this is my unscientific, untested,
unresearched theory. I’m going to assume that air exiting the lungs is
going to be a constant temperature before it enters the throat, say 90 degrees
fahrenheit (excluding outside environment variables). The throat seems
key. If it is large then the air stays hot, if small then it is cooled
probably because the air is forced a bit faster and thus cooled before it enters
the mouth. BUT If you really experiment and stick your pinky into your
mouth you will find that the air is still hot at the back of your mouth, thus it
cools from your throat to your lips. Maybe this is due to the “small
channel” of air being cooled by other air just somewhat sitting around the lower
part of your mouth..
Couple other items:
Never puff your cheeks
The angle of the Clarinet should be around 30-45 degrees
Use a Mirror to visually look at your embouchure
Airstream practice ? try to blow a nice thin intense airsteam onto your angled
hand
Lower Lip Position/Throat
There are two method to bring the lip up to the reed.
1 – just raise your jaw. This process actually does not create the optimal
embouchure, and it places the lip in the wrong position on the reed/mouthpiece.
Of course the solution here is to take more mouthpiece into your mouth to
compensate. But this solution does not assist in the throat area.
2- Push the jaw out and have the lip reach to the reed. Thus provides a
lower position on the mouthpiece, just like taking in more mouthpiece but allow
you to control the tip and airflow onto the reed. This seems to increase
the oral cavity at the base of your throat, and supposedly affects the tone a
bit. Practicing this may make your jaw hurt a bit at first but it will
help in all areas of your embouchure and tone support.
Playing Flat
Embouchure – Mouthpiece Pitch
highly suggest you practice this when a proper professional teacher. Without
getting each minute detail correct you will not be able to do this without
pinching